Camping Recipes – Potato Boats

potato boats

On my hunt for new camping recipes I discovered this neat recipe for potato boats (which honestly is a glorified baked potato but it’s still fun). I really liked the idea of the variety it offered and also found it similar to TFD’s (tin foil dinners, another favorite camping recipe in our family).

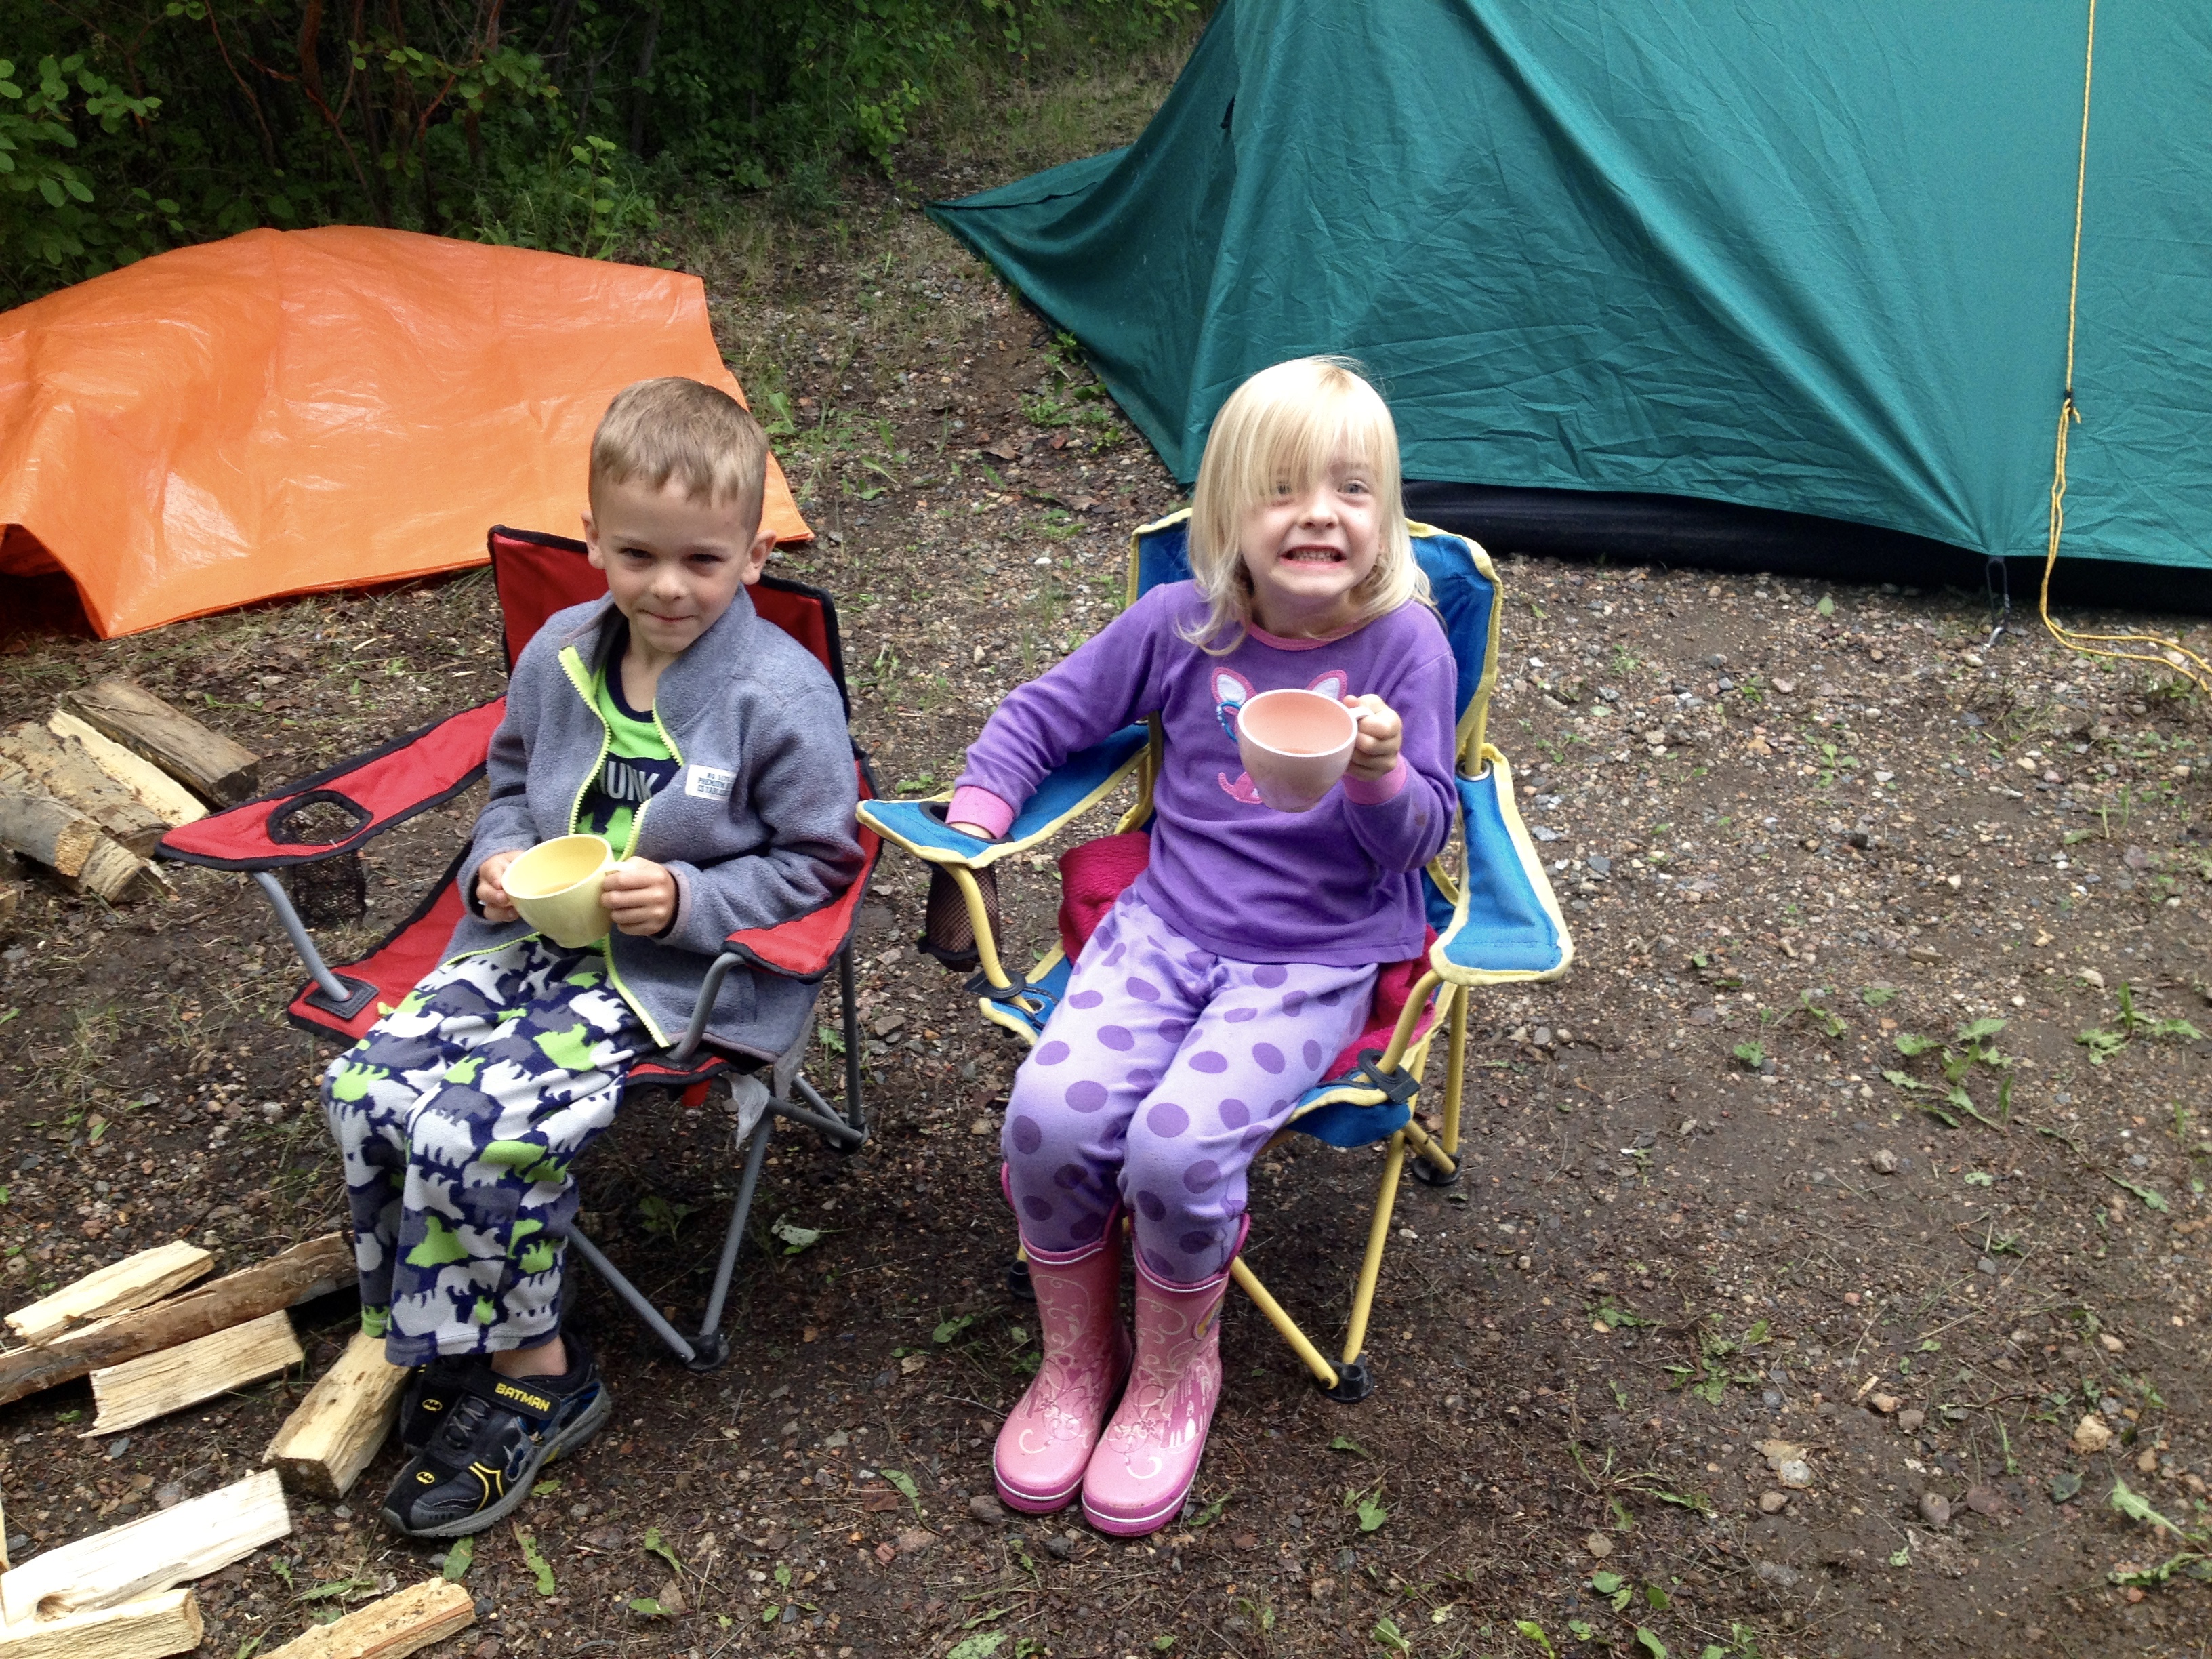
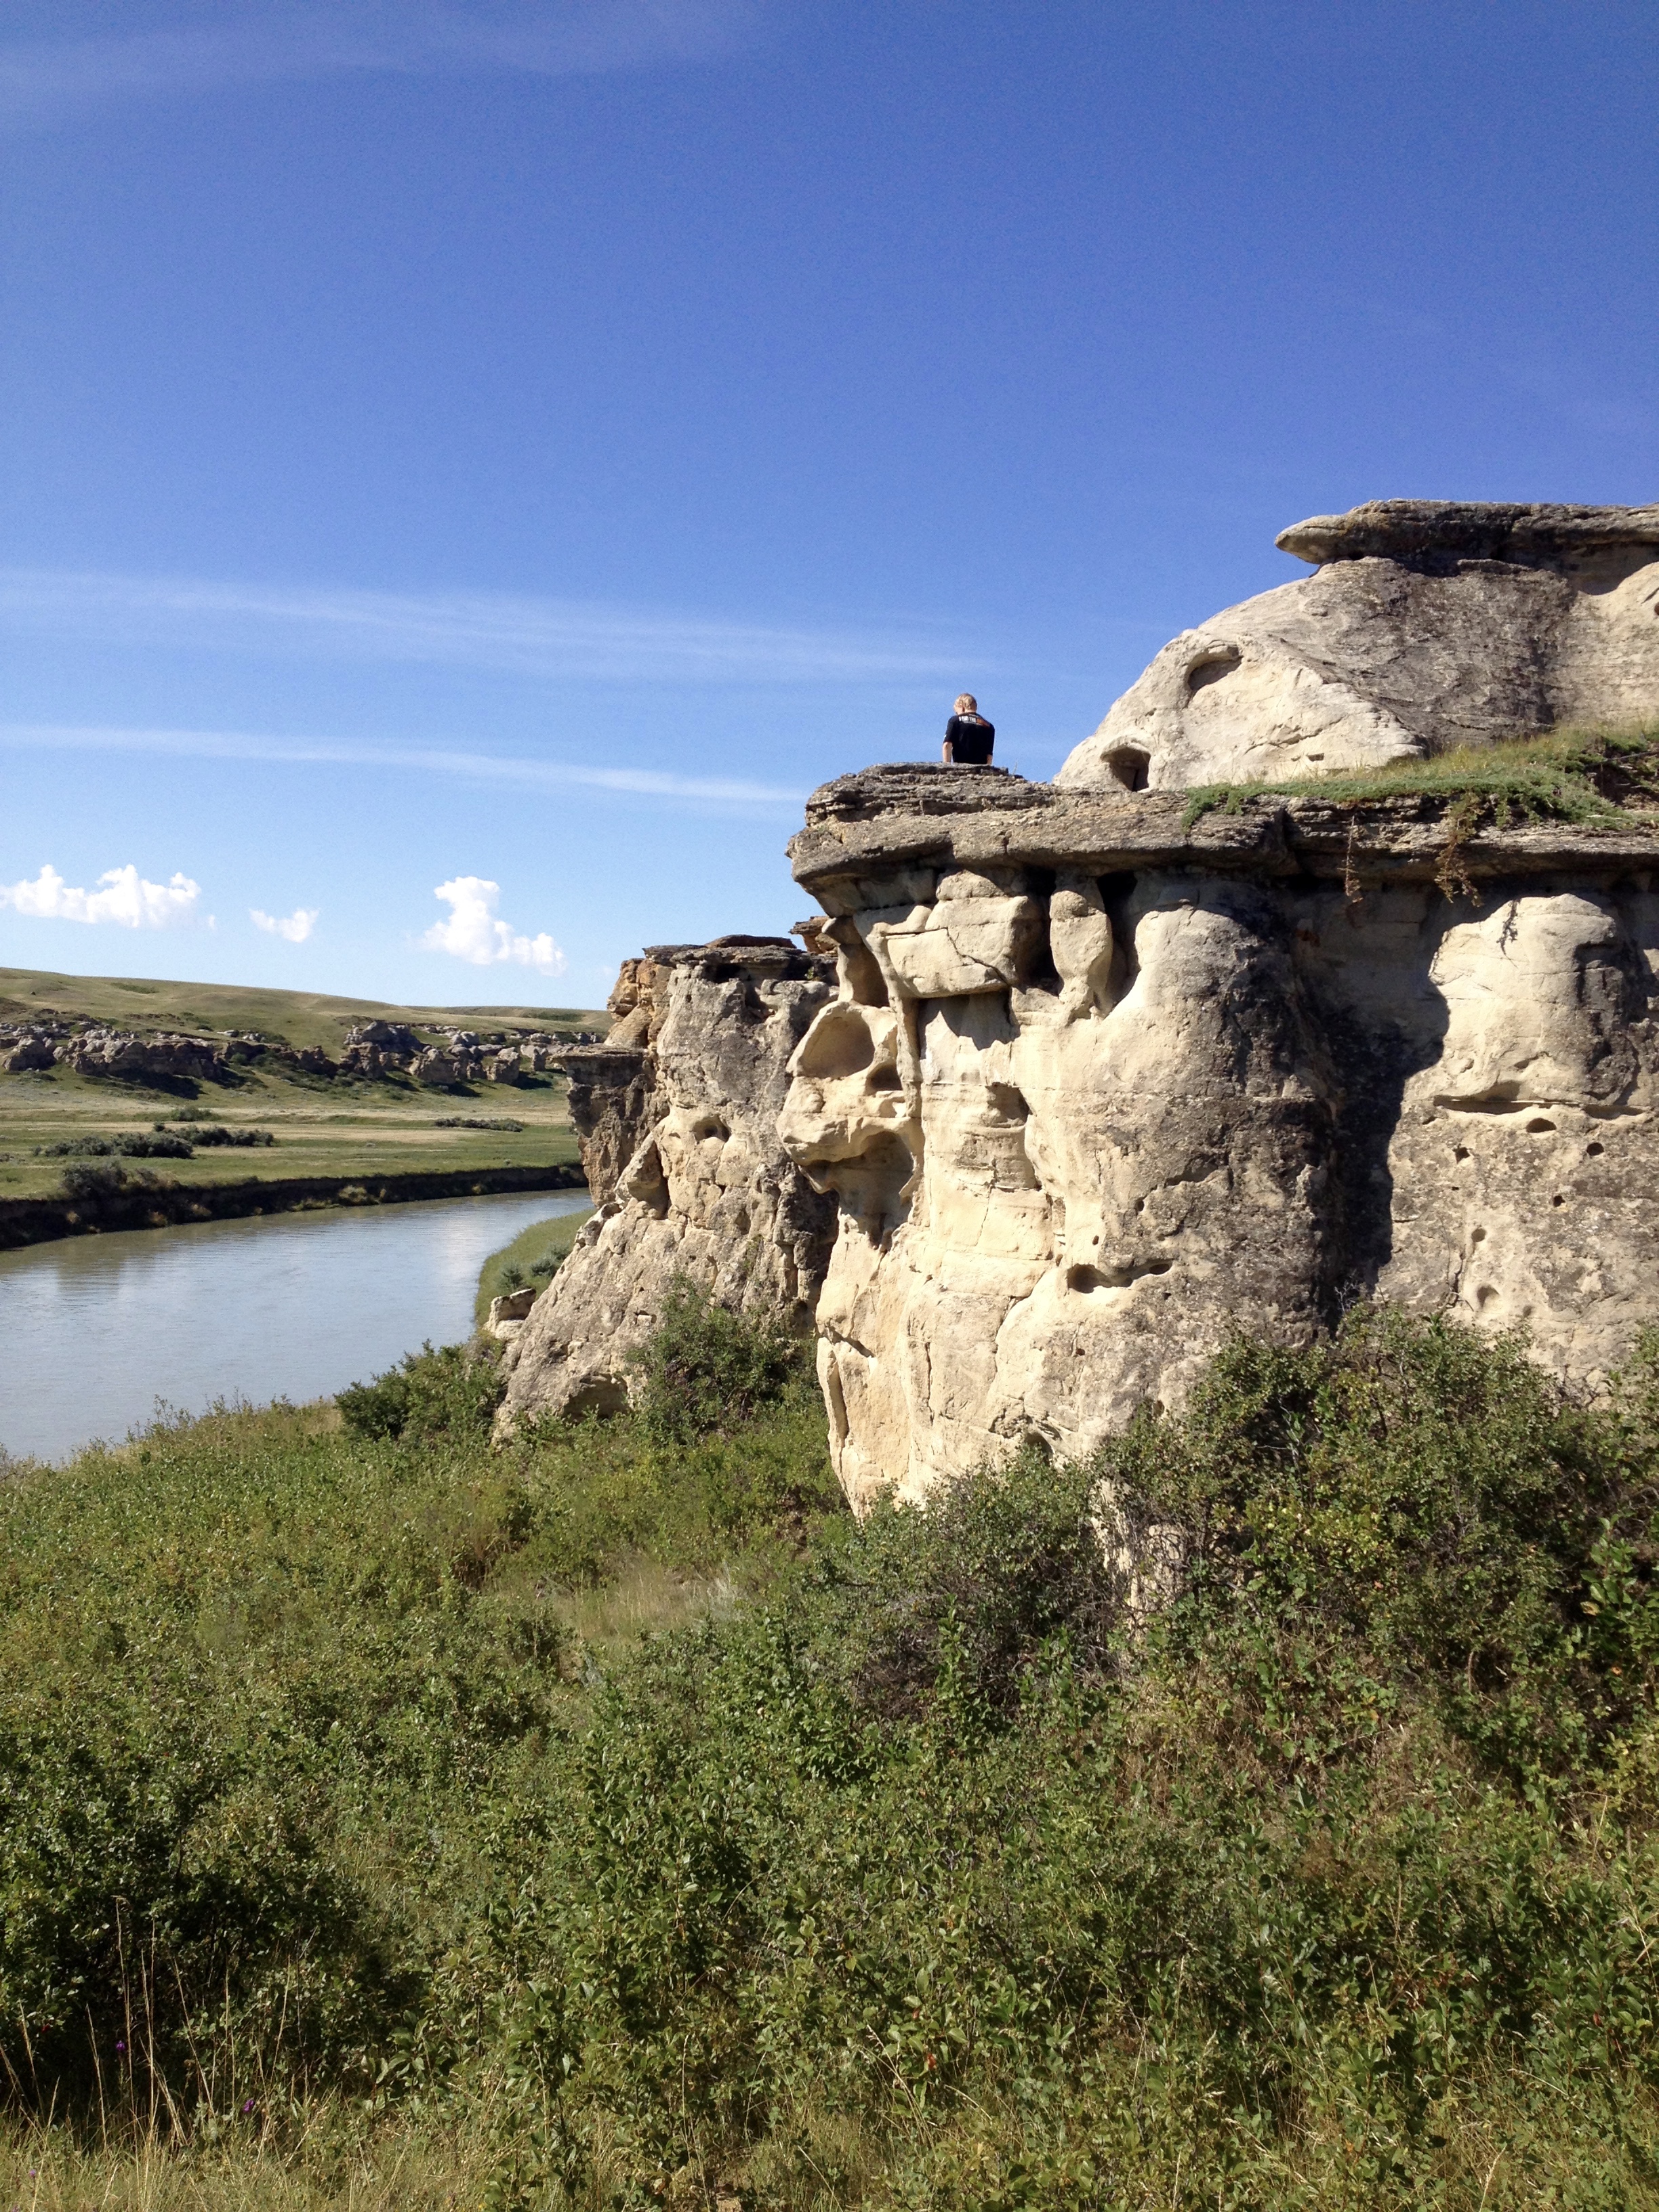
We tried it out potato boats this past week when we were camping in Writing on Stone Provincial Park for my oldest son’s birthday (He’s 13 now a real teenager in my home – yikes:). It’s a beautiful park in a part of the Badlands with magnificient hoodoos along the Milk River. This park is also a sacred landscape that contains the largest concentration of First Nation petroglyphs (rock carvings) and pictographs (rock paintings) on the great plains of North America.

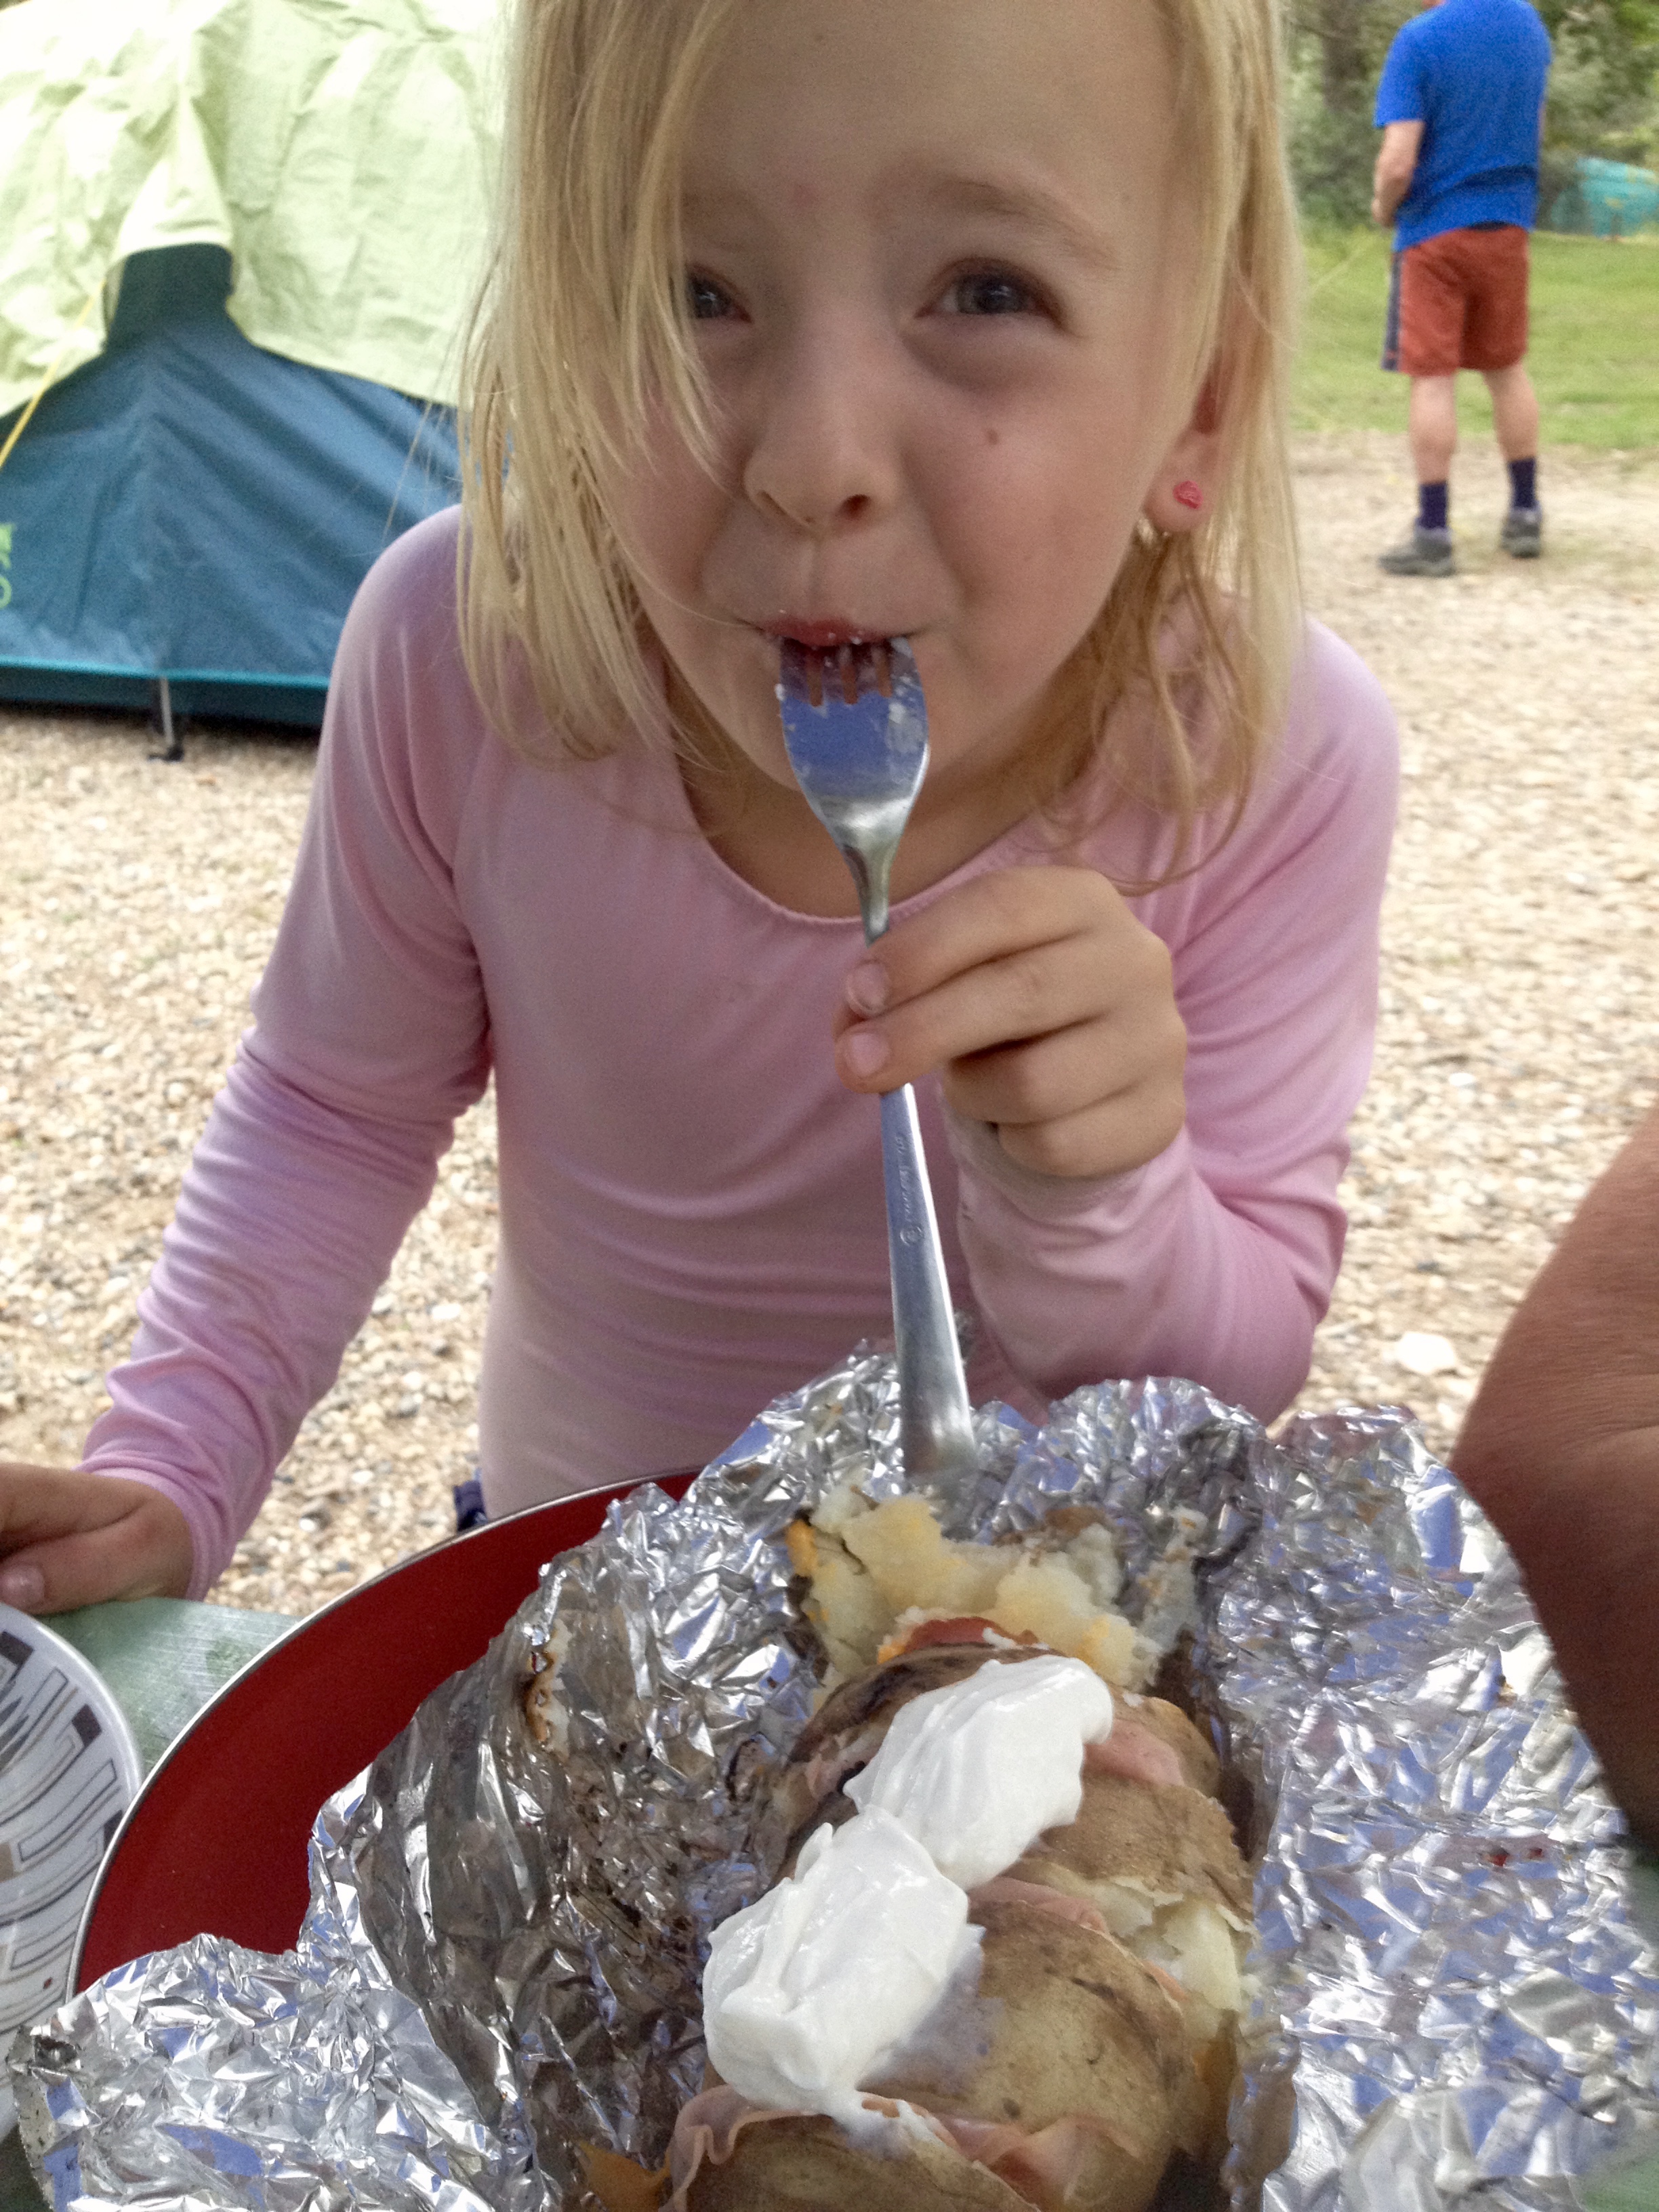
I thought Matthew would really like this recipe and since it was his birthday I let him choose what he wanted to have for supper. When I offered potato boats his eyes lit up and he practically salivated all over me. He even got the fire going so that I could get them started.

They turned out really well and all the kids loved them, Matthew practically inhaling his. They were a little too big though for the twins, in the future I would make one potato and give them each half. I also found it a bit too much for me as the portion was just too large.

potato boatsThe other downside with this recipe is that you have to bake the potatoes first and pre-cook your bacon. Then slice them put in the cheese, bacon, ham, etc. and then heat. For me, this was too many steps for a camping dinner and took too long. When I am camping I like recipes that are hearty, filling and delicious, but that are also quick and easy. The fact that I had to cook the potatoes and the bacon first and then put them together and cook some more wasn’t really appealing to me. But I made them anyway to see how they would turn out. And as I said they were delicious. I can see this recipe being one that would work well at home over the BBQ.

When we were camping, we did them over the fire, which I love because there are less dishes! but the flipside is it did take a little more time. First you have to build your fire and let it burn down to nice hot coals. You do not want flame as this will burn your potatoes. This can take at least an hour or more to get the coals you need, and then at least an hour to bake your potato – great if you’re kicking around the campsite.
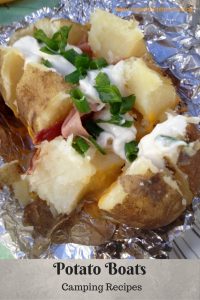
Potato Boats

(amounts are based on one potato per person and is dairy free – may choose to serve half depending on appetite and age)
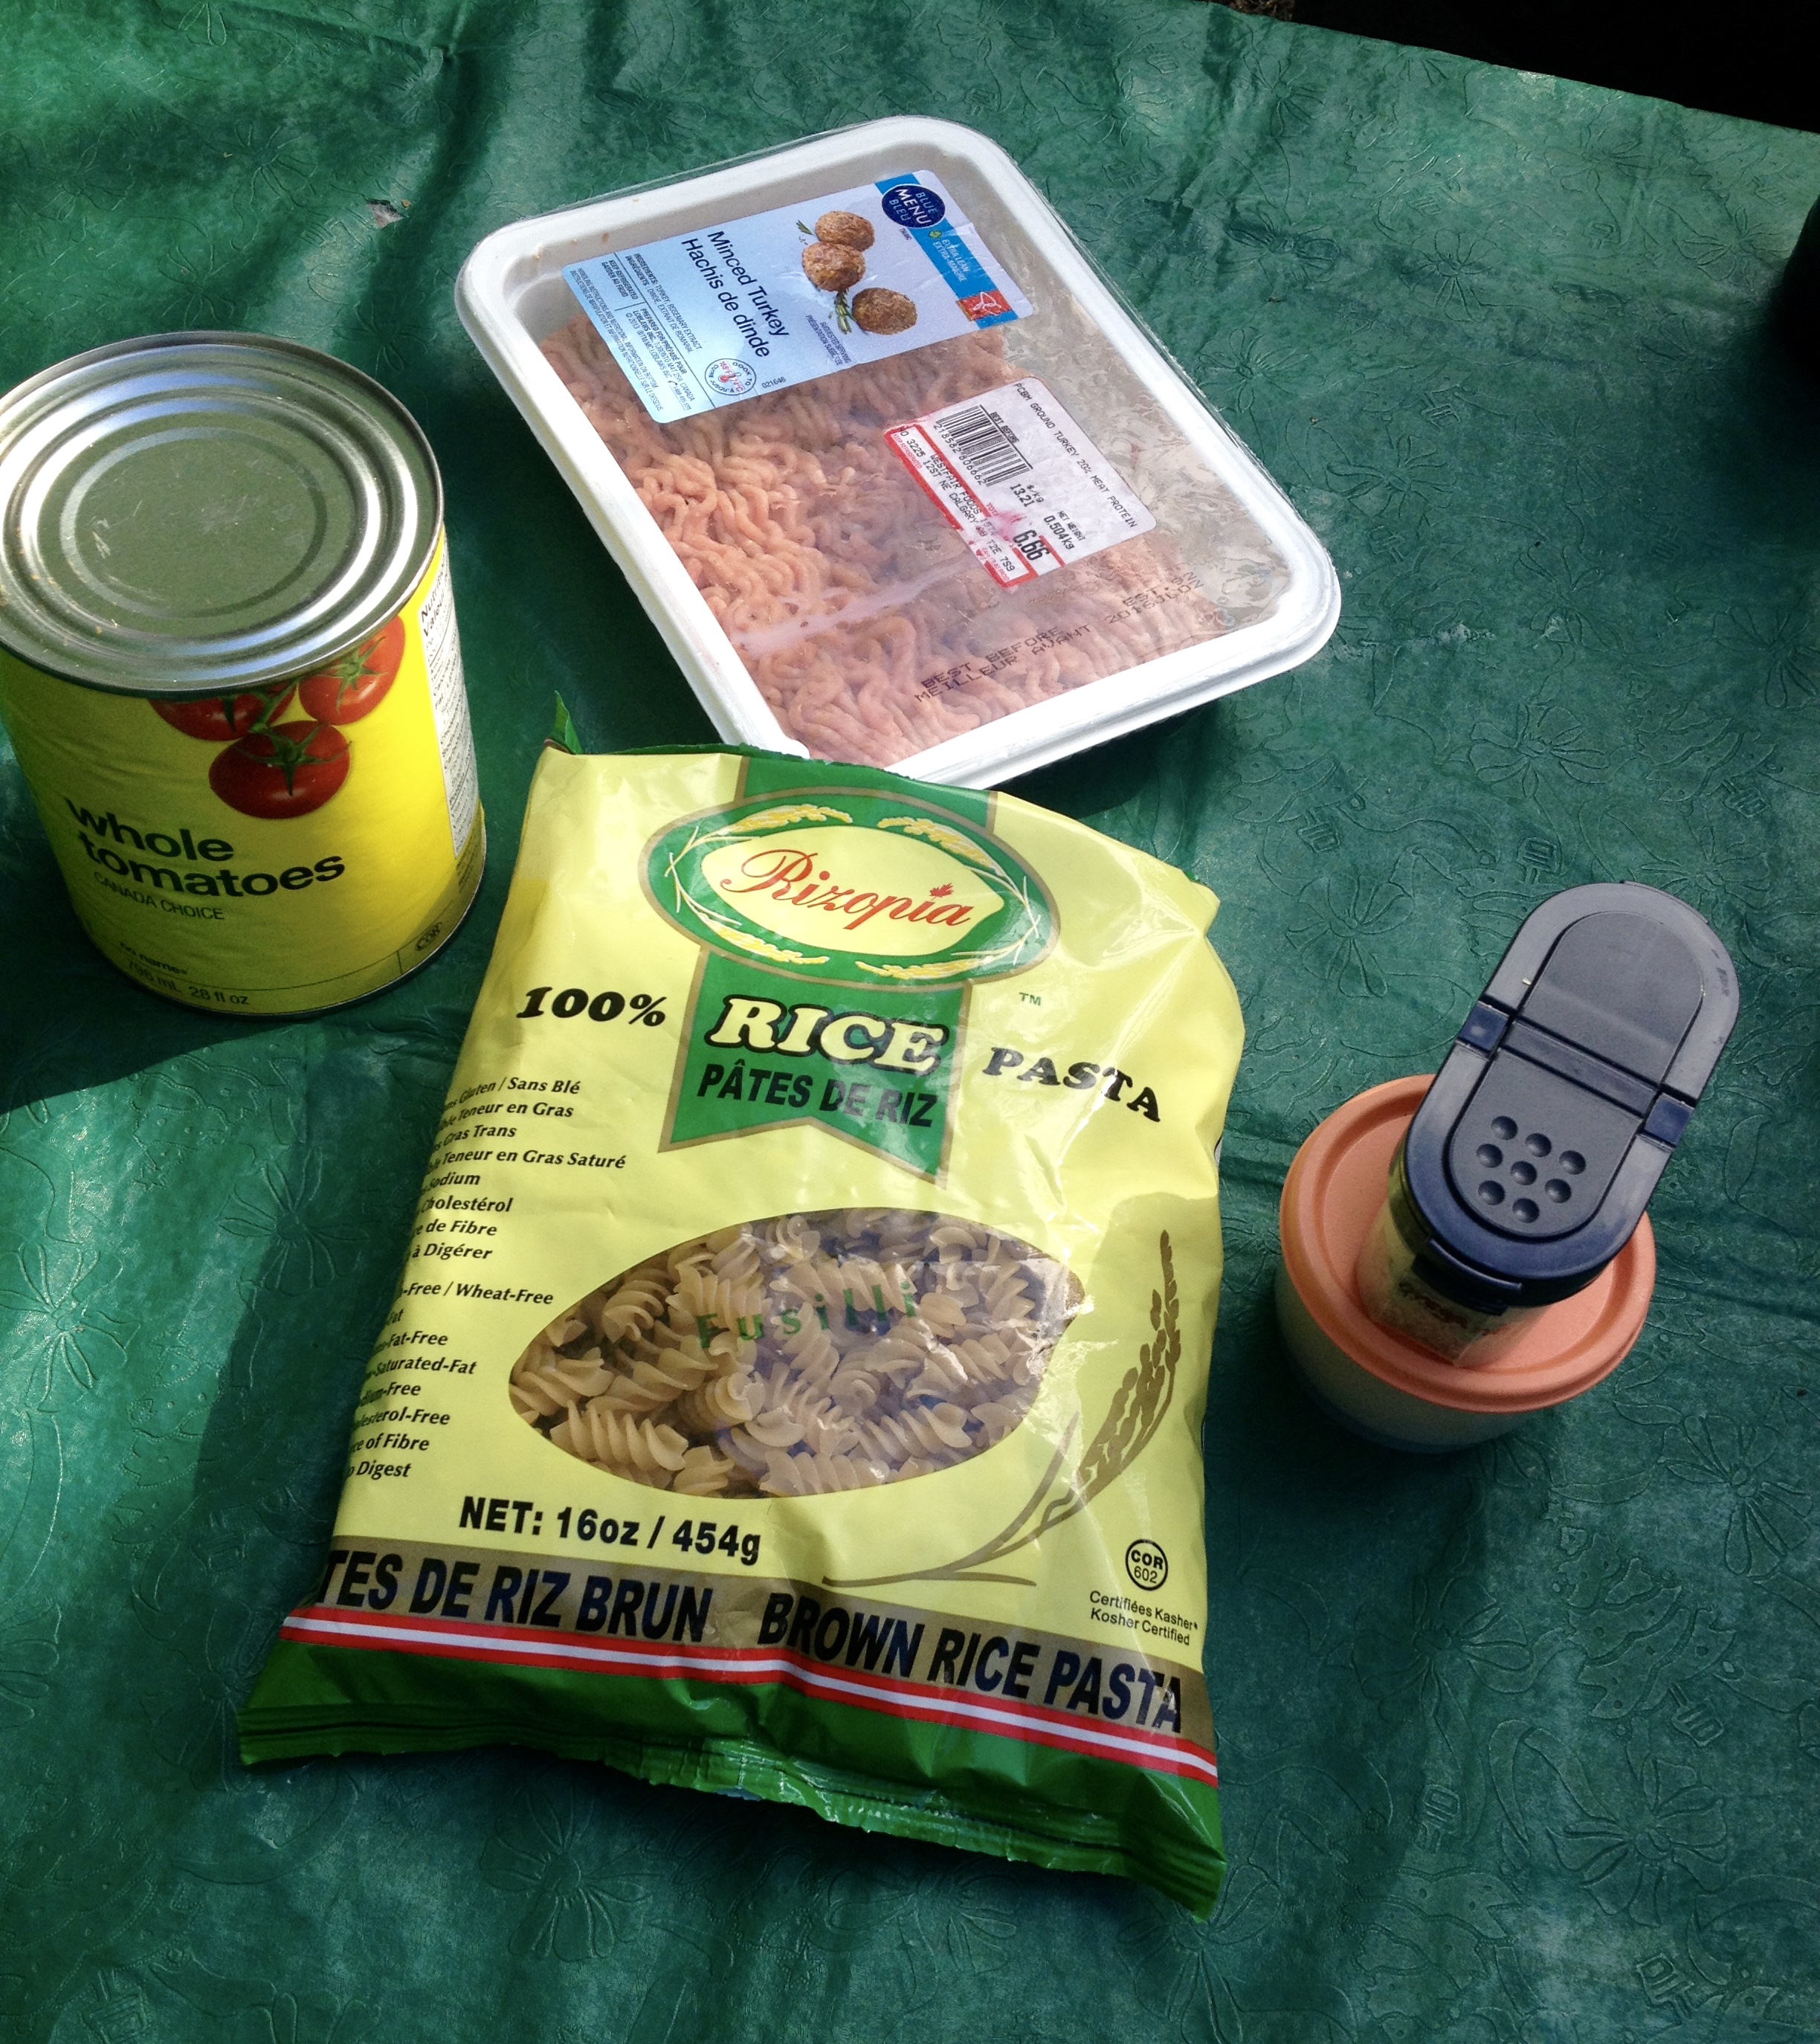
1 baking potatopotato boats

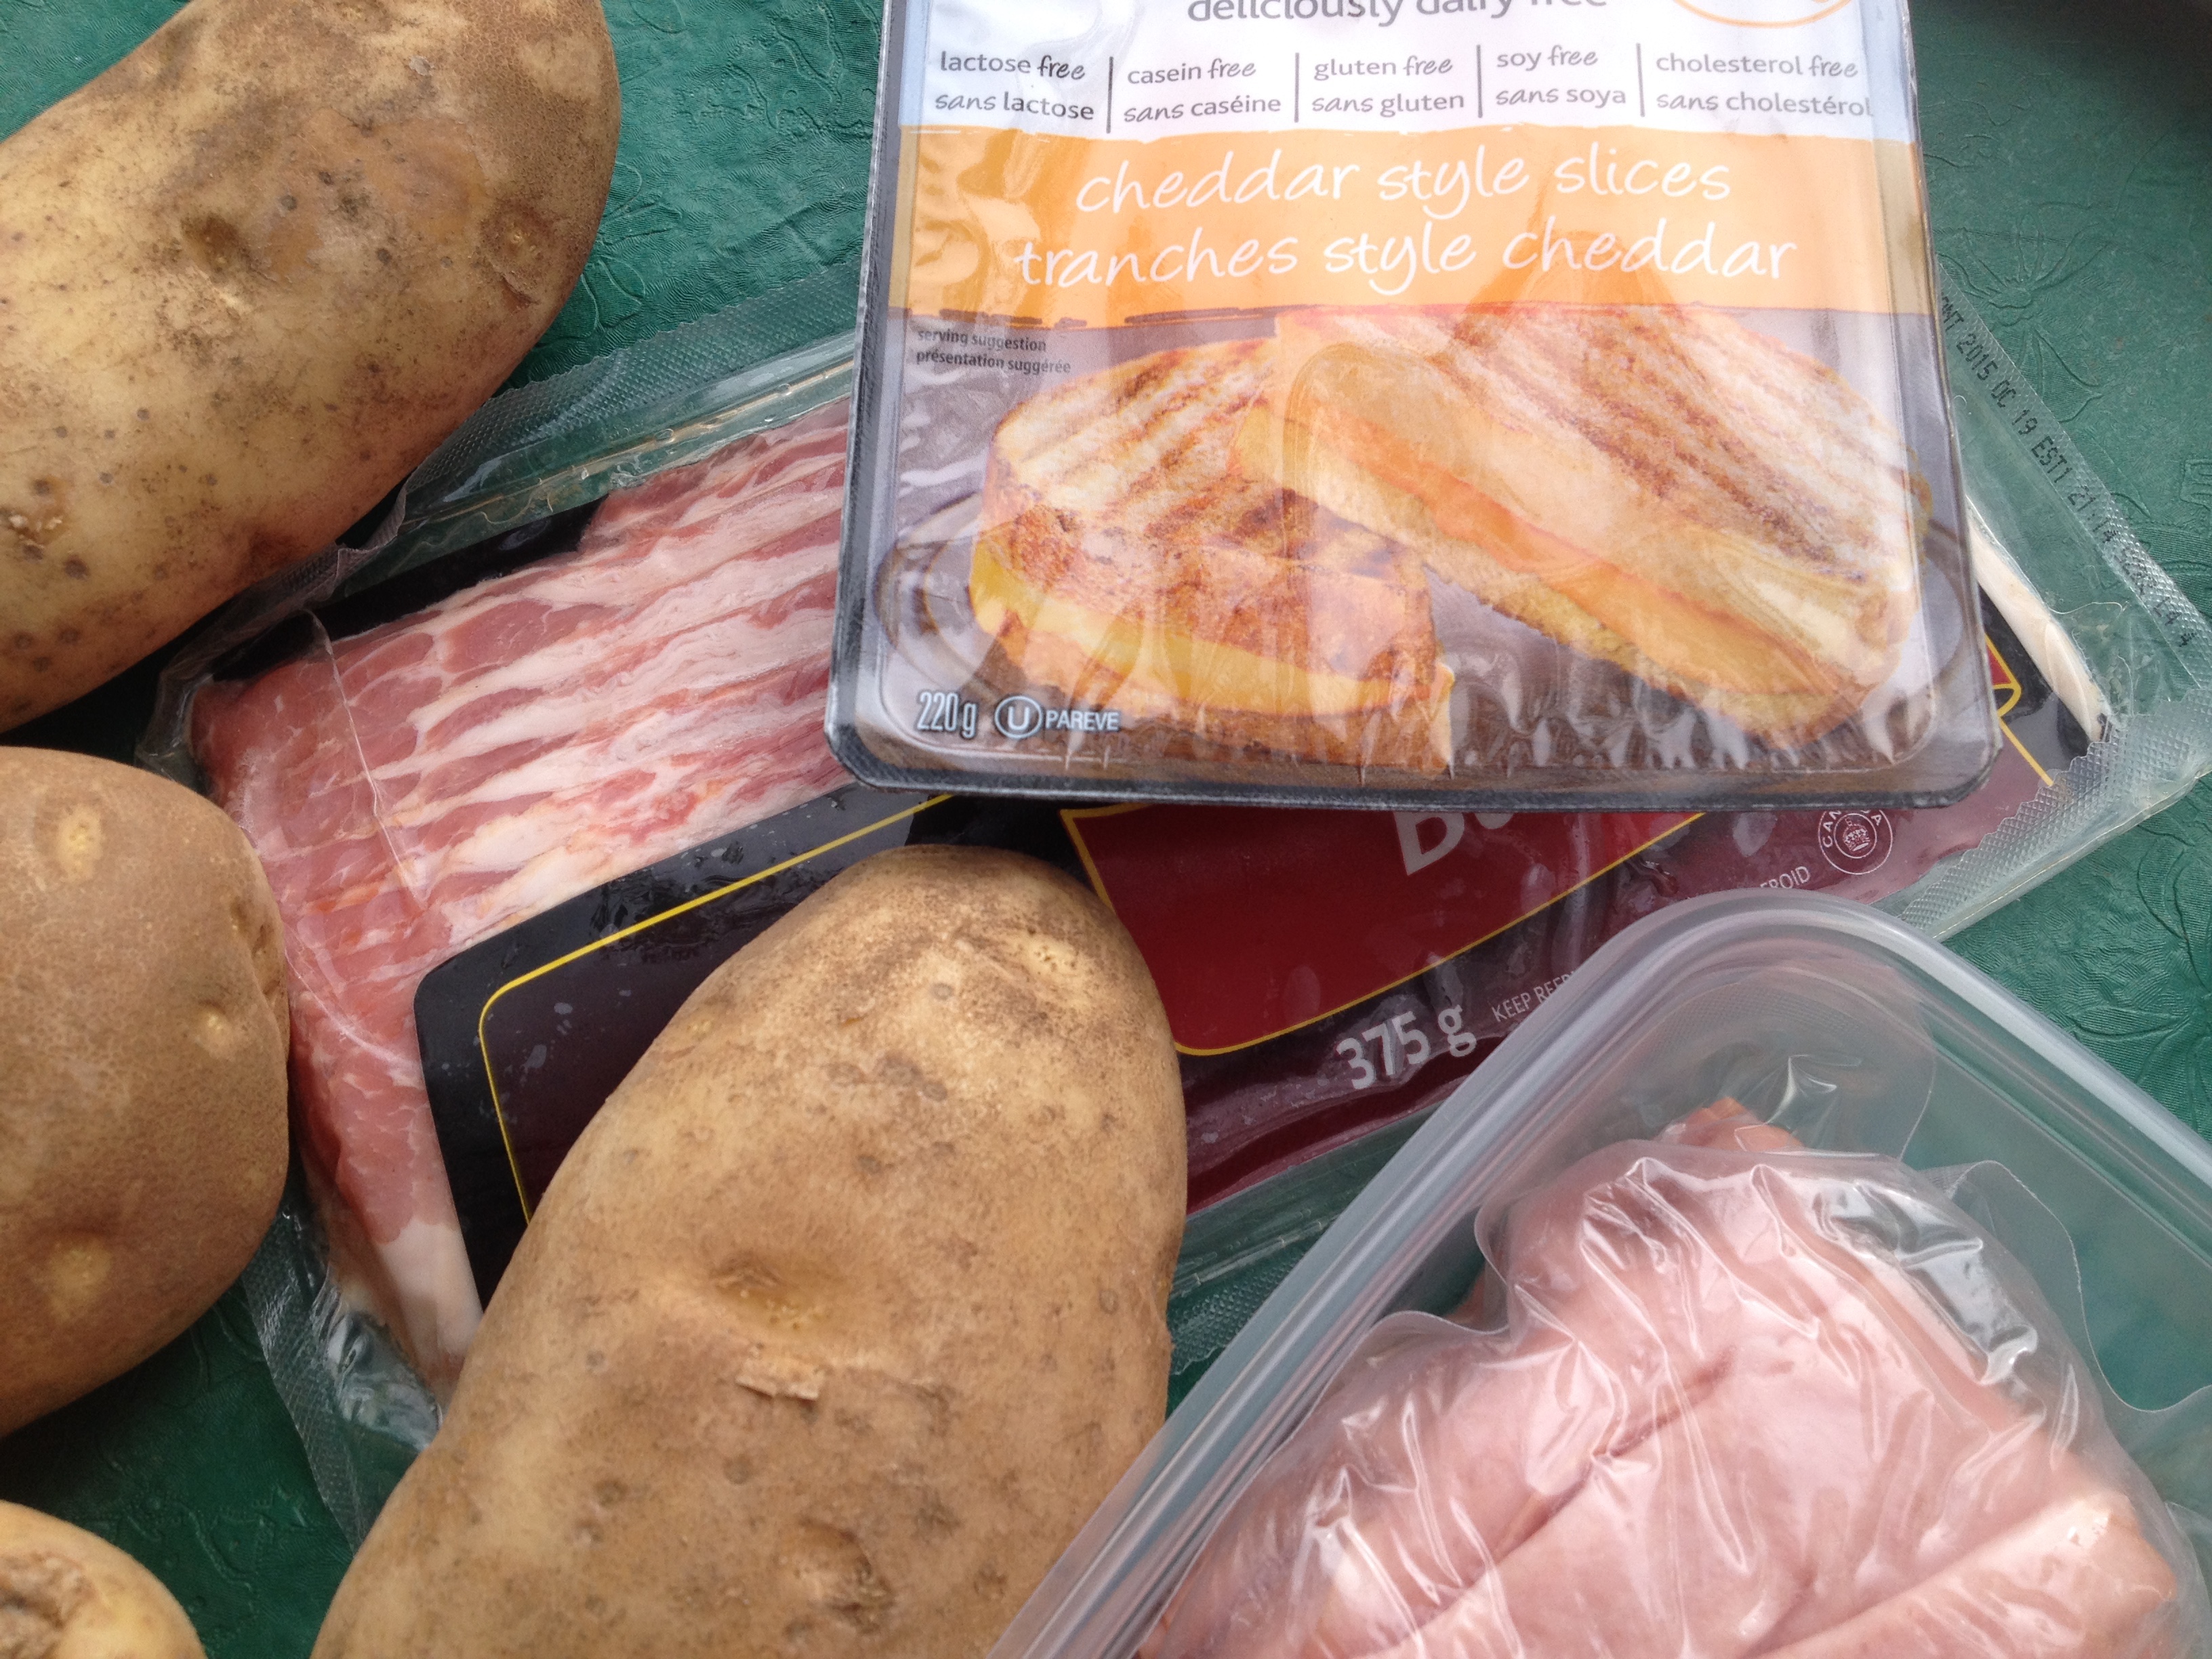
1-2 slices of bacon, cooked

1-2 sliced ham

1 Daiya cheese slice

green onion, chopped for topping

Earth Island’s non-dairy sour cream

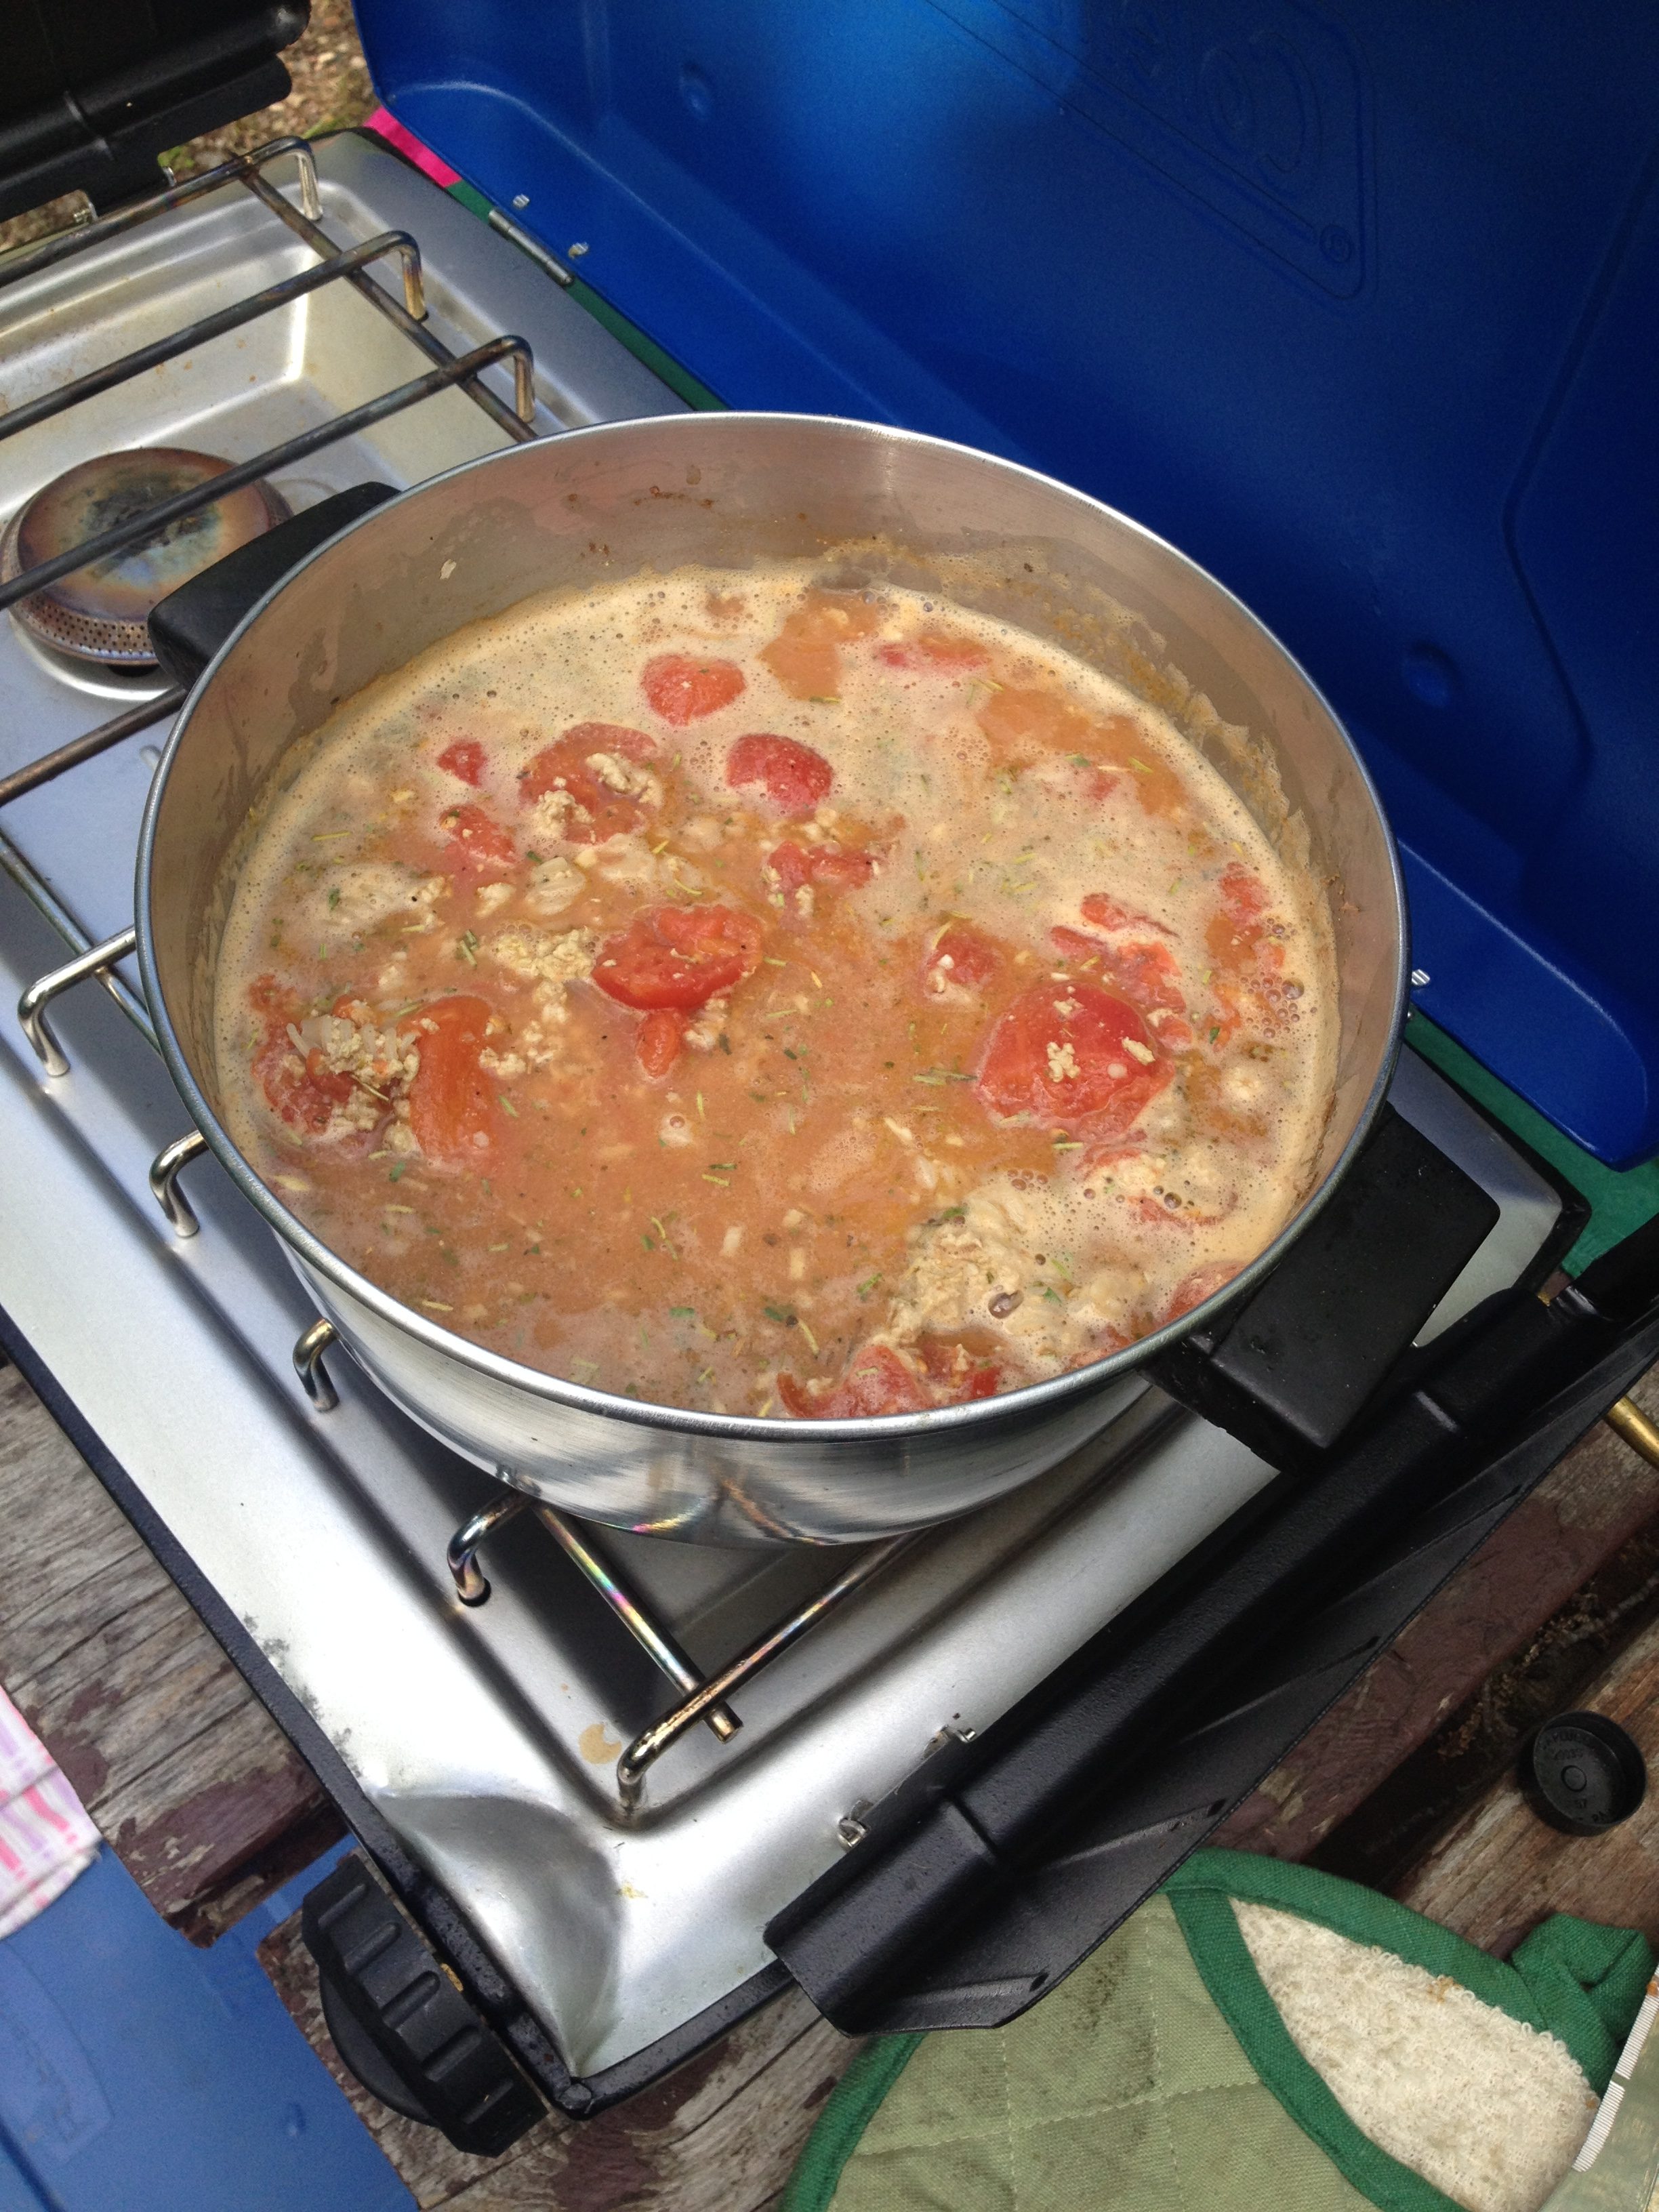
Wash and prep potatoes for baking. Poke holes with fork all over potato and wrap in single layer of heavy duty foil. Bake potatoes in hot coals of campfire, approx 1 hour, turning once. When potatoes are soft, remove from fire and open foil. Cut 4 slices along the potato, do not cut all the way through to bottom. In each sliced section put in cheese, bacon and ham. Rewrap in foil and place back on coals for about 10 minutes.

potato boats
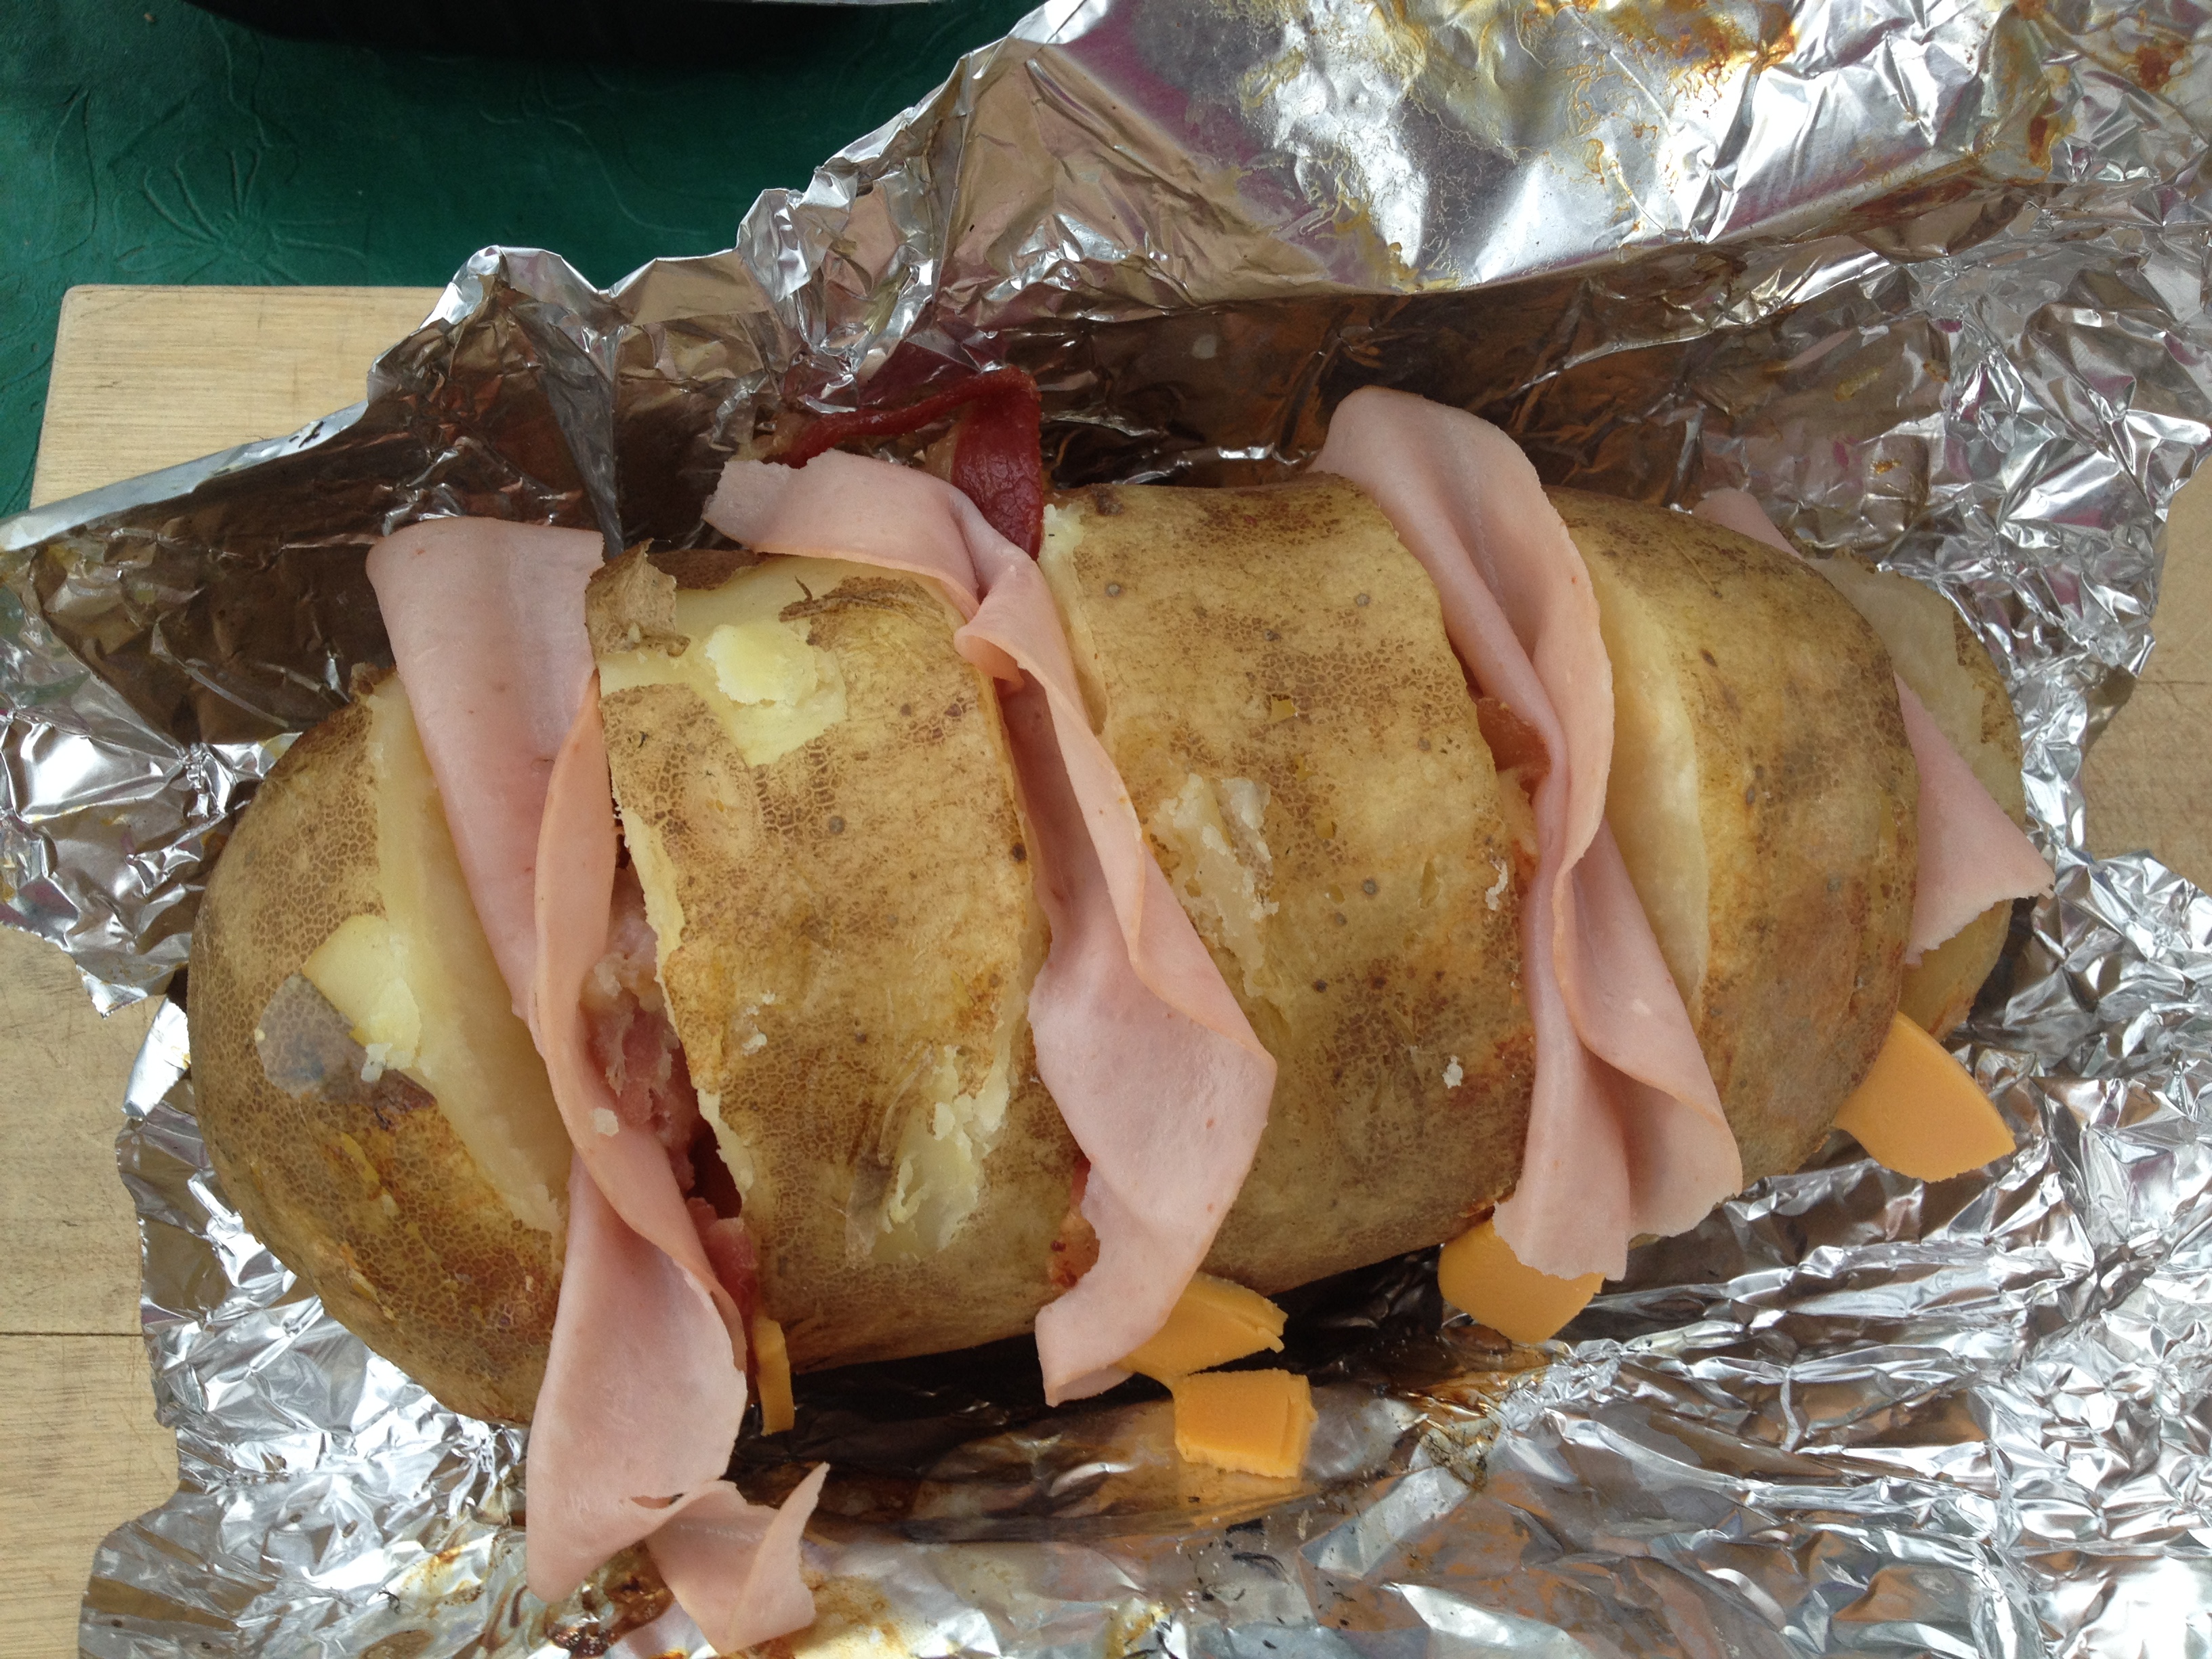
Remove from coals once cheese is melted. Serve with sour cream and green onions on top.

In making these and deciding there were too many steps for me making while camping, I came up with a couple of things that could make this dinner easier and a little bit faster if you don’t want to spend two hours making dinner.

If you were having this meal for your first night you could bake the potatoes and cook the bacon at home then simply stuff them and reheat them on the coals of the fire. You would still need to build your fire and get it to coals but then the actual cooking time would be cut almost in half as it would only take about 20 minutes on good coals to heat through.

It is definitely a hearty delicious meal and you could certainly change up what you ‘stuff’ into the slices. I had planned to serve grilled veggies with it but just ended up serving them raw in the end. You could also serve with a side of fruit if desired.

potato boats

Try it out and share your thoughts in the comments below? Did you stuff it with something else? How did you enjoy it?


Homemade Sugar Free Peach Pie

sugar free peach pie

Peaches are one of the wonderful fruits that are fresh and abundant in the summer months. Stock full of vitamins and minerals (like Vitamin E, K, A and lots of B’s), there’s nothing like biting into a fresh juicy peach on a summer’s day.

We often get our peaches fresh from the Okanagan fruit stands while out visiting Gran and Grandpa in BC, ok that is the only place we get our peaches. Once I’ve bitten into a fresh ripe Okanagan peach I just can’t bring myself to buy them in the store. They simply aren’t as good, not as juicy and not as flavorful. So once we’ve eaten them all I don’t get any more (unless I can go back to BC and get some).

Besides eating them fresh (my son sometimes eating 4-6 at a time!), I usually make peach jam, (which I love!), and make the odd crumble. It wasn’t until my neighbor went on one time about how much he loved peach pie that I even considered the possibility. I love making pies in the summer with all the fresh fruit, cherry pie being my favorite, but I had never made peach. So I set out to experiment.

sugar free peach pieWhen I originally found and made this peach pie recipe it was before we had eliminated refined sugars from our diet. So when I pulled up the recipe this summer (as my mother was asking that I share it with her) I had to make a few adjustments. I hadn’t realized that it still had white sugar in it.

I thought about using agave nectar, which I knew would work and is what I did originally when I transformed my cherry pie recipe, but I have heard a number of reports lately that agave is no better than refined white sugar. I had recently tried using honey in a pound cake recipe that turned out successfully so I decided to give honey a go for the peach pie.

As luck would have it, it turned out great, and everybody ate it up. With my oldest son even commenting that my pies are way better than Gran’s, as he inhaled his pie. My tip though is to make sure that you mix the honey in very well with the flour mixture so you don’t get any clumps of flour. The other option is to do the flour mixture without the honey, sprinkle it over the peaches, and then pour the honey over the peaches. It does produce a lot of juice regardless so I recommend a deep pie dish for sure.

Sugar Free Peach Pie

2 – 9″ pie crusts (store bought or homemade*)

1 egg beatensugar free peach pie

5c. sliced peaches, peeled and sliced

2 tbsp. lemon juice

½ c. flour

1 c. honey

½ tsp. cinnamon

1/4 tsp. nutmeg

1/4 tsp. salt

2 tbsp. butter

Brush some of the beaten egg on crust to keep from getting soggy. Place peaches in a bowl and sprinkle with some lemon juice, mix gently. In a separate bowl, mix flour, honey, spices and pour over peaches, mix gently. Pour into pie crust, dot with butter. Put on top crust fold edges under. Flute or seal by pressing with a fork dipped in egg. Brush egg over the top crust.

Bake at 450 F for 10 minutes, then reduce heat and bake for 30-35 minutes until crust is brown.

Enjoy! (And don’t forget the ice cream! We enjoy a delectable creamy non dairy vanilla ice cream by Rice Dream. It’s fantastic.)

* I make my own pie crust which turns out flaky and delicious every time simply by using Tenderflake and following their recipe on the box.

What’s your favorite kind of pie in the summer? Share in the comments below.

Camping Recipes – Campfire Lasagna

camping recipesI love camping! There’s just something about packing up your stuff and living with only what you’ve got for a while (either all packed into the car or the camper). It often makes me wonder why we have so much stuff in our houses when we can live happily with so little when camping? I love being outside all the time, not concerned about dishes or cooking as I’m outside; and the kids love it to to. We never run out of things to do, places to see or explore.

Camping is very freeing. Though there’s still a rough routine I find there’s no strict timelines, the kids play or ride their bikes, go to the playground or we happily all sit around the campfire watching the flames spark and pop and adding our wood as needed. Everyone’s always engaged in something, even if we are just sitting there.

camping recipesOne thing I have found with camping is that the food always tastes good. Maybe it’s just our ravenous appetites from being outside and active all day but whatever’s on the menu always tastes delicious. That being said we have our favorite camping recipes that we tend to make on a regular basis as I find that they are not only quick but satisfying (and usually contain a lot of meat – though we are not big meat eaters at home). This season though I was feeling that we were having a lot of the same old and though I enjoy our meals when we’re camping, I was looking to add a little variety and eager to try out some new recipes. What else we could create enjoy and add to the favorites (creating a little more variety in the menu)?

So as usual I went searching and found some great recipes which I am going to feature here over the next few weeks. From campfire dinners to desserts, there are some great things to choose from.camping recipes

The first one I found happened to be a recipe I’d had for years in a recipe book from my mother, but had never actually made, in fact I don’t know if she has ever made it. I loved that it was a one pot deal, throwing everything in the pot and just waiting for it to cook. This was the essence of easy and I hoped taste.

We tried it out earlier this summer when we went on our camping trip to Vegreville to see the Giant Ukrainian Easter Egg – which is definitely a site to see and worth the stop, if you are ever in Northern Alberta. And it was quite delicious! It was a great mix of flavors and a nice variety in a pasta dish, as opposed to the regular spaghetti and tomato sauce we typically had (not that there’s anything wrong with spaghetti!) This offered something yummy and different and got our ‘meat requirement’ in. Ha ha

This recipe can be made on the stove or over the fire and is literally ready in 30 minutes!

Campfire Lasagna

1 lb. ground chicken (or turkey or beef)camping recipes

1 tsp. oregano

2 c. spiral macaroni (we use brown rice pasta, gluten free)

1 pkg. onion soup mix *

1 – 796 ml can tomatoes

2 c. water

1/3 c. non-dairy parmesan cheese

1 c. Daiya mozzarella

In a large pot, brown meat. Add onion soup mix, oregano, tomatoes and water. Bring to a boil and stir in macaroni. Cook uncovered, until macaroni is tender. Stir in parmesan cheese and mozzarella.

I often make my own spice mixes as well as I like to avoid the MSG and other preservatives they put into the pre-mixed ones in the store, so I did create my own ‘onion soup mix’ which turned out to be quite flavorful and definitely did the trick for the desired taste.

*Homemade Onion Soup Mixcamping recipes

2 1/2 tbsp. dried minced onion

1 tsp. onion powder

1/8 tsp. salt

1/8 tsp. pepper

2 tbsp. homemade chicken boullion mix (or beef boullion if prefered)

Mix all spices together.

This recipe was such a hit that Luke asked for the leftovers the next day for lunch. That’s a really good sign.

Do you have a favorite dinner camping recipe? Share it in the comments below so we can try it out.

Rich Creamy Dairy Free Chocolate Ice Cream


dairy free chocolate ice cream

One of the most popular frozen sweet treats in the summer is most definitely ice cream. It’s great to be able to stop and enjoy an ice cream cone on a warm summer’s day. In fact I was drooling over them yesterday at the zoo, as everyone was walking around with a yummy soft serve ice cream.

When we went dairy free I was sad to miss out on all the wonderful ice cream flavors and the sweet yummy treat it provided. (I really missed ice cream and also cheese when I went dairy free, cause at the time there were not any really good dairy free alternatives). Not only was ice cream a great summer treat it used to be a staple at my house! When we were little we’d often anticipate ice cream after dinner, with my Dad being the worst contender.

I knew there were ways though that I could still indulge in my ice cream fetish that were still yummy and delicious without all the dairy. My first step was to buy a ice cream maker. Though not a necessity to make ice cream, there is just something fun about watching your liquid concoction turn into yummy ice cream. I also tried out some of the non dairy ice creams on the market, which there are some good ones, such as Rice Dream and Coconut Bliss, but they are very expensive and making my own was a much cheaper alternative. Besides I could control what I put into my ice cream and could avoid all the preservatives present in store bought brands.

dairy free chocolate ice creamAnd honestly, making your own ice cream does not take long at all. It is basically the time to mix your ingredients in your blender and churn it in the ice cream maker (usually about 30 minutes tops). So if you time it right there really is no waiting at all (and even if there is, doesn’t that create anticipation and excitement therefore enjoying even more the result?)

Making ice cream is also fun and easy to do with the kids. My kids help mix everything up and also love watching it churn. So far we have tried a few dairy free ice cream recipes, such as Simple Vanilla and Strawberry Banana, but our favorite so far is Peanut Butter Ice Cream, oh so yummy!

But what I like about this dairy free chocolate ice cream is the fact that there is no milk in it whatsoever, not even non-dairy, and uses cashews instead to create the creamy texture, which really amps up the nutrition. Cashews are a great source of fibre and are packed with vitamins, minerals and antioxidants like copper, Vitamin E and magnesium. I love it when I get to enjoy a yummy sweet treat and it is super good for me and for the kids (nothing like sneaking in the good stuff right?).

The other element that is important when I am trying out recipes is that they are sugar free, using natural sweeteners to sweeten if needed. So not only is this dairy free chocolate ice cream without dairy, it also has no refined sugars or sweeteners. And believe me taste is not compromised. This is a rich creamy chocolate ice cream that you will not believe is sugar or dairy free. You can serve it to you friends and they will be none the wiser.

My kids of course, gobbled it up and asked for seconds. Chloe got chocolate all over her face and they both got a little creative adding raspberries that they’d freshly picked from our raspberry bush, which made it even more delicious.

You could also add in other ingredients to this chocolate ice cream, like coconut or chocolate pieces.

Dairy Free Chocolate Ice Cream

1 3/4 c. cashewsdairy free chocolate ice cream

1 3/4 c. water

1 c. pure maple syrup

2 tsp. vanilla

1/2 c. cacao powder

Combine all ingredients in a blender and mix well. Pour into an ice cream maker and freeze according to instructions.

I found that our ice cream maker brought it to a nice soft serve consistency, which is what I believe most ice cream makers do. You can serve as is or if you’d like to have a firmer consistency transfer contents from ice cream maker into freezable container and put in your freezer til firm.

*If you do not have an ice cream maker don’t despair! Once ingredients are combined pour into a freezeable container with lid and place in your freezer for 6-8 hours or overnight. The advantage of an ice cream maker is simply that your ice cream is ready a little bit faster.dairy free chocolate ice cream

Do you have a favorite non-dairy ice cream recipe? Share in the comments below.

Frozen Sweet Treats – Peach Slush

peach slushA highlight for many in the summer is slushy frozen drinks. Often times we would simply pop to the 7-11 and grab a slushy, but once I started paying more attention to what actually went into these slushies (can we say mountains of sugar and artificial flavors?) I was on the hunt for a slushy recipe that I could easily make at home (and without all the sugar!)

When I started browsing for ideas I came across this recipe for a peach slush; which it turned out I had already saved a while back in my recipes to try. It was also the perfect time to try it as we had just returned from the Okanagan with a mountain of fresh peaches.There is nothing like using your fresh fruit to make your delectable treats! It was a perfect fit. Peaches are also rich in vitamins such as Vitamin A, beta carotene and Vitamin C, as well as many minerals so super good for you!

At first I was a little hesitant to make it cause though it was a quick mix of ingredients in the blender, it was the 1 to 2 hours of waiting and stirring that deterred me a little bit. I kind of like instant! Plus I sometimes forget when I have to pay attention to things to stir every so often. But I found a way to make it work and honestly it was not that bad. Plus it makes a great easy, healthy, naturally sweetened frozen treat that you can make and enjoy at home.

The original recipe did not call for any sweetener but I found it needed just a little bit so I added in a teaspoon of honey. Depending on your level of desired sweetness will depend on whether you opt in to add it yourself. I can also see this recipe working well with other fruit such as strawberries, raspberries, maybe even watermelon.

Of course the kids enjoyed it. They are great little testers of Mom’s new recipes and help me adjust it when needed. Try it out and let me know what you think.

Peach Slush

2 fresh peaches, peeled and chopped

1/8 c. waterpeach slush

1 tsp. honey

1 tsp. fresh lime juice

Peel peaches by putting them in boiling water for 30 seconds. Chop peaches into chunks and put in a blender.

Add water, honey and lime juice. Blend until smooth consistency.

Pour into a 9×13 pan and freeze in freezer for one to two hours. Stir a few times so that it does not freeze into a solid block.

When ready stir and whip it up with a fork so it has a nice slushy consistency.

Serve immediately in a cold dish. Makes 2 small servings

Have a great slush recipe? Share in the comments below.

Frozen Sweet Treats – The Fresh Fruitsicle

frozen sweet treats

One of the things that is great about summer is the delicious frozen sweet treats that you get to enjoy on a hot summer’s day. Creamy fudgsicles, ice cream, freezies, slushies, popsicles and more all offer a refreshing cooling treat.

The trouble is with most frozen sweet treats is the amount of added sugar (and color) that is in them to make them ‘sweet’. Don’t get me wrong, I love a sweet treat just as much as the other guy, but in eliminating refined sugar at our house, we have learned not only how to naturally sweeten our treats, but also that we don’t need it as sweet anymore. Our tastebuds have adjusted and we enjoy the natural flavors and sweetness of fruit (and foods) without the added sugars.

frozen sweet treatsWhen I was growing up it was not uncommon for my mother to make popsicles simply by pouring fruit juice into popsicle molds and freezing them. As long as the juice was unsweetened we were already enjoying a yummy cooling sugar free treat.

When I became a mother I made these kinds of popsicles for my kids as well. The thing is, I often found that once you sucked on them for a while, all the juice was gone and you were left with ice on a stick. I was looking for a frozen sweet treat that would have flavor all the way through and of course, naturally sweetened.

My first discovery was Grasshopper Popsicles, a mixture of blackberries and spinach, yes I said spinach, and a few other ingredients to put it all together. For a while this was our staple popsicle, which the kids really enjoyed. It was my mother when visiting one summer, who introduced us to this simple creamy popsicle that has added a little more variety to our popsicle pickings.

The Fruitsicle, as she calls it, is a fruity, creamy, dairy free, sugar free popsicle that is super easy to make. You just put all the ingredients into the blender and mix, then pour into the popsicle molds and wait for it to freeze. (The waiting is the hardest part, my kids were continually asking me if they were ready yet).

The Fresh Fruitsicle

1-2 cups fresh strawberries, trimmedfrozen sweet treats

1 ripe banana, peeled and cut into chunks

½ cup coconut milk

1 to 2 tablespoons raw honey

Put all ingredients into blender and blend until smooth. Pour mixture into popsicle molds and freeze for 6-8 hours or overnight.

*if you’d like your popsicle to be a little sweeter simply add more honey or more strawberries to the mix

Makes 8-9 popsicles depending on the size of your popsicle mold

2 Fabulous Watermelon Salad Recipes

watermelon salad

Watermelon is such a refreshing snack in the summertime. Full of vitamins and minerals, it can be more then just a cut and serve option.

For some reason I had always thought that watermelon was just that, cut, slice and serve, that you couldn’t really do anything else with it. I have no idea why I thought that, maybe it was just the ease of preparing a refreshing summer snack. But lately I started exploring a few other watermelon recipes (like a watermelon smoothie, oh my so yummy!).

I had always heard of a watermelon salad but kind of thought it was weird. I’d often see them at an event or a buffet and pass it by as it just didn’t appeal to me. Well I had no idea what I was missing!

watermelon saladWhen I decided to explore watermelon recipes I knew that a watermelon salad was the first one to try! It turned out that I found two that are really good. Both are uniquely different and delicious, so I can’t really say that one is better than the other. It honestly depends on what flavors you are looking for in the moment. Both have the lovely addition of fresh lime juice, which is not only nice in the summer, but actually brings out the flavor and sweetness in the watermelon.

The first watermelon salad is the more common recipe with feta cheese and red onion (which honestly at first I thought it was totally weird to add feta and onion to watermelon), while the second is a nice crisp, refreshing fruit salad. Which I actually quite enjoyed, even though it called for blackberries. In general I do not like blackberries and usually buy them for the kids and skip them myself. But since it was in the salad I decided to try it. I actually found the blackberries to be quite lovely, they added a really unique flavor to it, and I enjoyed quite a bit.

Both watermelon salads were a hit with the kids! They gobbled them up and asked for more (I think they were quite enjoying my experimentation with these recipes). And I have to say myself, a watermelon salad is a very nice change in how watermelon is served (and it does not take long to prepare – I am all about ease, especially in the summertime!)

Both salads are best when made just prior to serving. When the watermelon sits for too long it tends to get limp and soggy. Make one hour or less before ready to eat.

Watermelon Salad

4 c. watermelonwatermelon salad

1/4 red onion, finely sliced

2 tbsp. fresh chopped mint leaves

1c. feta cheese, crumbled

1/4 c. olive oil

3/4 of lime, juiced or 2-3 drops Lime essential oil

1/4 tsp. pepper & a shake

Cut rind from the watermelon and cut into 1 inch chunks. Place watermelon into medium size bowl. Chop mint. Combine olive oil, lime juice and pepper to create dressing.

Pour dressing and chopped mint over watermelon. Toss gently to coat.

Pour crumbled feta over salad and stir gently to combine. Enjoy!

Serves 4

Watermelon Blackberry Saladwatermelon salad

3 c. cubed watermelon

1 1/2 c. blackberries

2 tbsp. fresh finely chopped mint

Juice of one lime or 2-3 drops of Lime essential oil

Cut the rind off the watermelon and cut into one inch chunks. Place watermelon into medium bowl. Chop mint and add to bowl. Add blackberries. Squeeze fresh lime juice over the fruit. Gently toss to combine and serve.

Serves 4

Have a fantastic watermelon salad recipe? Share in the comments below

A Refreshing Twist on Watermelon – The Watermelon Smoothie

Watermelon SmoothieThe other day my youngest son said he had an idea to make a watermelon smoothie. We love watermelon especially in the summer! It is such a nice refreshing snack. For us, we usually just slice it and eat it, I had never really thought of doing anything else with it. Sure I had heard of people putting watermelon into salads or other recipes but I had never thought of putting it into a smoothie. It just seemed odd to me.

But really, why not? You can put basically anything into a smoothie and with the right combination, can be absolutely delicious! And we love smoothies at our house and enjoy trying different combinations. In fact, I have been experimenting this year with creating my own smoothie recipes. It’s fun figuring out what goes well together and what might not. When I create a really good one, I get very excited. Like when I created this yummy green smoothie in the spring with grapefruit, orange and dandelion greens- yum!

The other thing I didn’t realize is that watermelon is actually chalk full of vitamins and minerals like Vitamin A, potassium and magnesium to name a few. Plus it has many health benefits benefiting cardiovascular health, anti-flammatory and antioxidant support. Here I thought it was just water and that you didn’t get much else out of it. Even better!

So I set out on a hunt for watermelon smoothie recipes to see what was out there. There are many that are a combination of watermelon and strawberries (which seemed quite popular), some with almond milk, even some with coconut water (which I am going to have to try that one). But the one that I was drawn to the most was this combination with raspberries, fresh lime and mint. All favorite ingredients of mine. I love mint and am really into lime lately. I also liked that it was described as ‘the most refreshing smoothie, ever‘. It quickly made me think of hot summer days when you’re looking for something a little more than just a glass of water. I could see myself, sitting on the deck, smoothie in hand, relaxing and enjoying the hot summer sun…

When I whipped it up this afternoon I was not disappointed! It was fabulous. I could not believe how delicious it was and even though it was not super hot that day, I could see how enjoyable it would be on a hot summer day. Not to mention I love the rich red color and how sweet and fresh it tastes. I can’t wait to make it for the kids who were away for the weekend, especially my son, to not only thank him for the fabulous idea, but to see how much they enjoy it as well.

Watermelon Smoothiewatermelon smoothie

1 c. watermelon

1/2 c. frozen raspberries

fresh lime juice (squeeze 1/4 of a lime) or 1 drop lime essential oil*

2 sprigs of fresh mint

Put all ingredients into blender. Mix until well combined and is smooth. Pour into glass and enjoy!

*note: if you’r using lime essential oil ensure that it is safe to ingest as all brands of essential oils are not created equal and not all are safe to take internally

Serves 1

Gluten Free Bran Muffins with Raisins & Hemps Seeds

gluten free bran muffinsI have always been a fan of muffins. They are a great grab and go snack that will fill your tummy and give you some good nutrition. They are also a fantastic make ahead and freeze for later option as well – something you can quickly grab out of the freezer to add to lunches, road trips or just a quick snack.

I have been dabbling more and more with gluten free recipes as I have noticed that my body does not seem to tolerate it like it used to. Often feeling tired after bread, muffins or anything wheat based, I have been slowly expanding and experimenting with my recipes. I was a little worried about changing my muffins though, as I had found many gluten free muffins to taste grainy or gritty and certainly not to my liking. But I knew that they couldn’t all be that way and that if it was the difference between energy boost and energy drain then I had to give it a whirl. So I started experimenting…

I am a big fan of bran muffins and have been since I was little. I know most people don’t care for bran muffins, more like a love it or hate it relationship, but for whatever reason I really enjoyed them. And it wasn’t just because of the benefits of bran! They were yummy. So it was only natural that one of the first muffin recipes I converted would be a bran one.

I found the original gluten free bran muffins recipe online and loved the addition of hemp seeds for the added nutrition. I also liked that I could create my own gluten free flour as all brands are not created equal, and this way I could choose what went into my mix. A quick modification for the sugar and the dairy I had the perfect recipe, which my boyfriend at the time, loved and he was not a gluten free guy. In fact to this day they are still his favorite muffin that I make.

The kids love them to, though they tend to like banana more, but they will eat them without complaint and I love the hemp seeds and flax added in there.

Gluten Free Bran Muffins with Raisins & Hemp Seeds

1/2 c. ground flax seedgluten free bran muffins

1/2 c. rice bran

1 c. almond milk (unsweetened coconut milk or other non dairy milk of choice)

1/3 c. olive oil

1 large egg

2/3 c. coconut sugar

1/2 tsp. vanilla

1 c. all-purpose gluten-free flour (*easy to make your own gluten free flour mix)

1 tsp. xanthan gum

1 tsp. baking sodagluten free bran muffins

1 tsp. baking powder

1/2 tsp. sea salt

2 tbsp. hemp seeds

1/2 c. raisins (I like lots of raisins so I add another 1/4 c. but you don’t have to)

In a medium bowl mix together flax seed, rice bran and almond milk. Let sit for 10 minutes while you get everything else ready.

Next, in a large bowl combine gluten free flour, xanthan gum, baking soda, baking powder, sea salt and hemp seeds.

In a different medium bowl, beat together the oil, egg, coconut sugar and vanilla. Add the ingredients from the first medium bowl (almond milk/ flax seed mixture) to the egg mixture and stir well.

Stir the almond milk mixture into the dry ingredients until just blended. Fold in the raisins.

Spoon batter by the teaspoon into greased muffin tin or line with cupcake liners. Bake at 375 F for 15-20 minutes or until toothpick comes out clean. Let cool 5 minutes then remove muffins from muffin tin to allow cool completely.

Store in an airtight container or freeze for easy quick grab and go healthy snacks.

* I found this combination for your own gluten free flour mix online. I make a batch and store in an airtight container so it’s on hand when I need it.

Gluten Free Flour Mix

4 c. superfine brown rice flour

1 1/3 c. potato starch (not flour, they are different)

2/3 c. tapioca starchgluten free bran muffins

A Little Indulgence – Dairy Free Sugar Free Chocolate Icing

dairy free sugar free chocolate icingI have a secret to share with you. It’s one of those don’t tell my kids or I’ll never live it down kind of secrets. I have a bit of an addiction. You know that chocolate icing that I made to ice the cupcakes? Yeah there was some leftover…there’s not anymore…

When I found this recipe for dairy free sugar free chocolate icing I was in heaven. It’s super simple to make and totally delicious! One would never know that it was anything near the sugar free area, let alone no dairy. It is creamy, smooth and definitely chocolatey! It is so good I sometimes eat it with a spoon. Hence, why there are no longer any leftovers in my fridge. Once in a while, when I have that craving for sweet I just dip in and take a spoonful or two…ok sometimes three. I often think to myself I will just freeze the rest and then when I need icing I can just pull it out and use it without having to make a whole new batch (the recipe is quite big – even when I half it I have generous leftovers). But unless I pop it into the freezer right away, yeah, I eat it, in big heaping spoonfuls and hope that my kids don’t find out (because I don’t want them to do it to! I know hypocritical).dairy free sugar free chocolate icing

This simple recipe requires only 4 ingredients and your food processor or blender. I use cacao powder for that extra superfood boost – as cacao is high in magnesium, B vitamins, protein and fiber – but you may also cocao, though not as beneficial nutritionally. And I use this icing recipe for all kinds of things, not just cakes and cupcakes. We put it on ice cream, fruit and last summer we discovered that it is a great substitute for some of those good old camping recipes, like s’mores, or the new one we discovered at Scout camp – a combination of banana, nutella (we use the chocolate icing instead), butter and toasted on a bun – yum!

So regardless what you are going to use it for, whether it be a little indulgence eating it with a spoon, cake or a camping treat, enjoy this quick easy dairy free sugar free chocolate icing guilt free.

Dairy Free Sugar Free Chocolate Icing

dairy free sugar free chocolate icing1 cup cacao powder

3/4 cup Earth Balance vegan spread

1 tsp vanilla

1 cup pure maple syrup (high in minerals such as maganese, zinc, potassium and no artificial ingredients compared to imitation syrups containing high fructose corn syrup, added and artificial ingredients, contain no minerals)

Process all ingredients in a food processor or blender until smooth and creamy.

Use immediately or may be stored in fridge for up to one week or frozen (unless you eat it all first).dairy free sugar free chocolate icing