The Ease of Pallet Gardening

Pallet Gardening

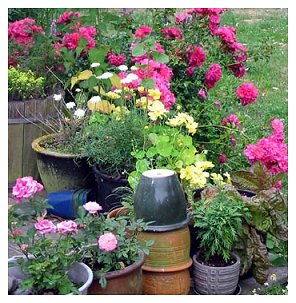
More and more people are going back to growing their own gardens. With the move to eating more organically, and taking care of our planet, many are reconnecting to the Earth. Nurturing and growing flowers, fruits and vegetables is increasing. From community to container gardening people are making the most of what they have to produce organic sustainable gardens.

For many though the challenge is space. With the newer houses and smaller yards – to put in a decent garden would take up a good part or all the yard space! Not to mention people who are in apartments or condos, where do you put it?

containergardenonsteps
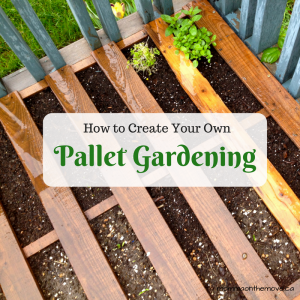
With container gardening being one solution, the newest discovery is pallet gardening, using an old pallet to grow plants or vegetables in. When I first learned about this last year I thought this was a really great idea. It allowed me to put the pallet wherever I wanted, so it did not take up space on my grass, I could expand my garden and grow more! and it was using materials that were easy to find and inexpensive. I could also move it around if I wanted to, though a bit heavy it’s great to have that option.

To make your own pallet garden you need:

  • an old pallet
  • landscape fabric
  • stapler
  • dirt
  • whatever you would like to plant

When you are looking for a pallet, you want one that is in good condition, not rotting, nails sticking out or broken boards. (And if you are growing vegetables in it you should opt for one that is heat treat as opposed to fumigated).

Measure out landscape fabric so that it covers the back and up the sides. Do this twice, as using a double layer will make it more durable and stronger. Once you have the fabric to size, put both pieces on top of one another and staple along the bottom, doing one corner, then pulling it taught and securing the opposite corner, etc. until all corners are secured. Then go along the bottom edge of the rest of the pallet. Pull the fabric taught and staple the sides.

Flip the pallet over and fill it with dirt. I would recommend a bag of dirt from your local garden center as it will contain more nutrients than the soil from your garden/ yard. Soils like organic potting soil or triple mix are excellent choices.

Plant your plants in rows between the slats of your pallet. You can start from seed or plant plants that have already been started inside or purchased. Water pallet well.
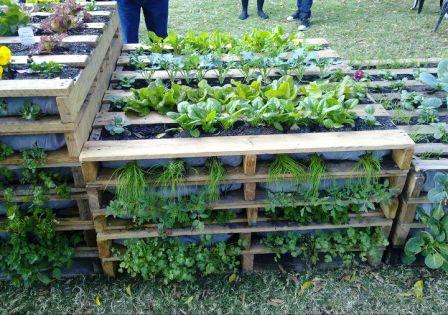
Stacking pallets

Stacking pallets

Now comes the fun part. If you have planted plants that are already started you can wait a few days until the roots are established then you can move your pallet. You can set it upright against a wall or fence. You could also plant another pallet and stack pallets on top of each other. This takes a bit of planning to ensure that everything is getting enough sun, but it is a great space saver and create a huge garden in a small space.

If you have planted from seed, you will have to wait longer if you wish to stack or put the pallet upright, as things need to be established before doing this.

Remember to water your pallet regularly as they tend to dry out much quicker than your regular garden.

plants-in-a-pallet
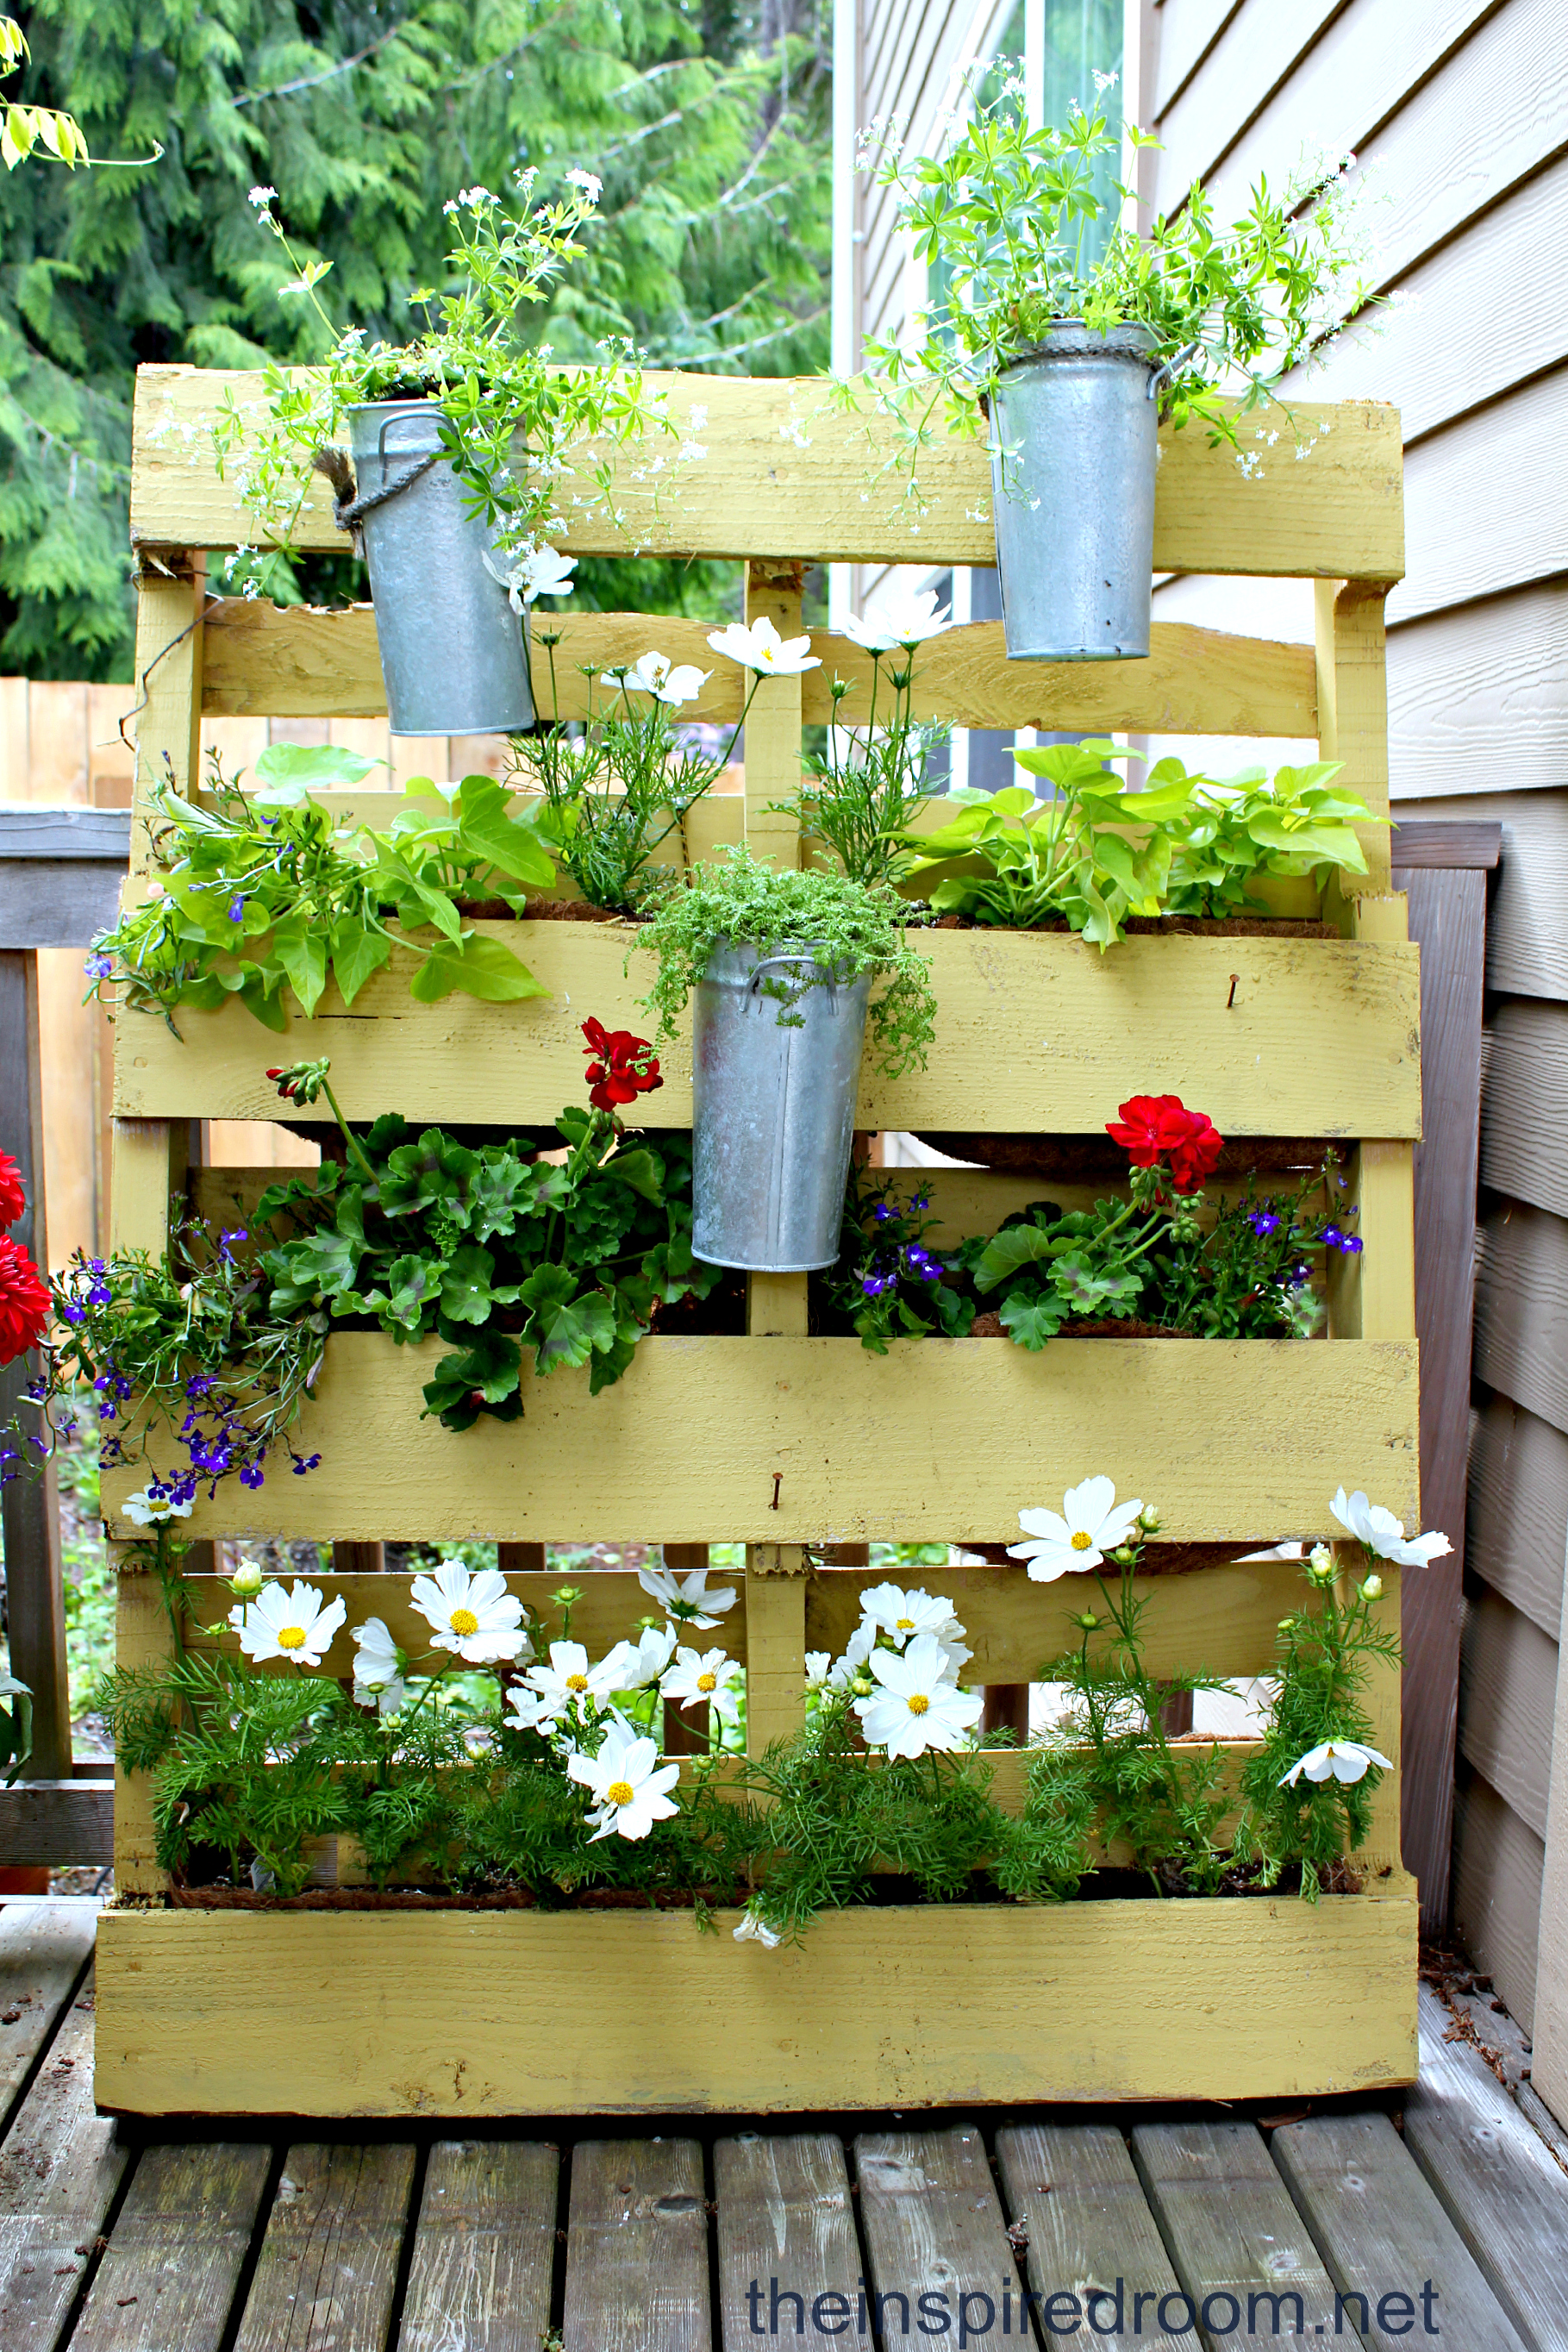
The great thing about pallet gardening is that you can get really creative with it. You can create eye catching designs for vegetable, herb and flower gardens in just about any space! Morning Chores has a fabulous resource with 43 different ideas for all kinds of pallet gardens. There is no end to what you can with your pallet!

I also think this is a great way to garden with kids, as they can get really creative. Not only are they able to help you with planting but could also decorate the pallet by painting or suggesting ideas on what to create.

It is also easy and accessible for them. Both Luke and Chloe helped me plant our pallet this year and enjoyed picking the seeds to put in. We usually plant vegetables in our pallet as we love to eat the fresh veggies from the garden. This year we have green and yellow beans, spinach, two kinds of lettuce, and a variety of herbs. Some we started from seed and some were all ready small plants we had purchased.

It sits on our deck which gets lots of sun, but is a great place for the kids to ‘watch’ what is happening as we go by it everyday on our way out to the car. So far our beans have started to come up as well as the spinach. Looking forward to seeing what the harvest brings this year 🙂

Taste of Nature – a Fabulous Sugar Dairy & Gluten Free Snack in a Package

Today I am very excited to be doing my first official product review!

When we decided to go sugar free in our home, it meant making a lot of things that we normally purchased and enjoyed, from scratch. Bread, salad dressings, treats, and granola bars were some of the items that contain refined sugars, which was one of the ingredients we were avoiding. I spent hours in the kitchen creating and trying new recipes, finding things that worked and we liked. And though I was happy to be making this healthy change for my family, I was not loving being in the kitchen for most of my day. My oldest son, was also struggling with wanting the prepackaged stuff that everyone else had even though what I was providing was indeed tastier and better for him.

IMG_2951Each time I went to the grocery store I would look in the organic/ health food section to see what ‘packaged’ products they had come up with. Yes you could find all kinds but they usually contained ingredients that we couldn’t have, like dairy, refined sugar and on some occasions gluten. I could find a dairy free product but it had gluten, or sugar free but it had dairy and nowhere could I find one that met all 3 (and tasted good, we have tried some that looked promising but they did not taste good at all).

So last week when doing my regular shopping trip I was very pleased to discover these fruit and nut bars by Taste of Nature! A Canadian company, these organic snack bars are delicious and come in a variety of flavors such as Canadian Maple Forest, Quebec Cranberry Carnival and California Almond Valley. Each flavor is a different mix of nuts, seeds and fruit, such as raisins, almonds, sesame seeds to exotic ingredients like dried cherries, pomegranite and cashews.

I immediately bought a couple and brought them home to try. We didn’t even make it out of the parking lot and the twins were asking to have one. So we sampled and shared the Brazilian Nut Fiesta. Wow! These bars were good! Sweetened with agave nectar and brown rice syrup these bars contain no artificial flavors or additives, have no dairy and no gluten! They are also certified organic, vegan, and kosher! We had hit the mother load!

I was so excited to have found these that I immediately came home and checked out their website. I was thrilled to see that they offered many more flavors such as Niagara Apple Country, Nova Scotia Blueberry Fields and Persian Pomegranite Garden. This is where I also learned this company aims to produce zero carbon footprint, uses green business practices and that providing quality products and caring for our environment are very important to them.

IMG_2955I was sold! This was a great company and one that met all our dietary needs. Woohoo! I could now spend a little less time in the kitchen 🙂

Over the course of the next week we tried a few more flavors, Canadian Maple Forest, Quebec Cranberry Carnival and Louisianna Pecan Parade (one of their newest flavors and my favorite as it has cashews and dried cherries in it!) Their other new flavor is Polynesian Coconut Breeze, which I am very excited to try as I love coconut as well!

Of course the twins have enjoyed all the flavors and my oldest son’s favorite is also the Louisianna Pecan Parade.

I am so pleased to see Canadian companies being innovative and creating products that are meeting the growing demands and changes of a healthier population and recognizing that there is a need and market out there. And the variety that this company provides is fabulous!

The other thing I was pleased with was the price for this product. At less than $2 per bar I thought this was quite reasonable considering the quality and variety of ingredients. We will definitely be purchasing more of these great bars and adding them to our healthy snacks!

I’d like to thank Taste of Nature who provided a variety of their fabulous bars for us to try. Thank you! They are delicious!

A Few of my Favorite Muffins

8I have fond memories of muffins growing up. This may sound a little weird but I was a competitive swimmer for many years and that meant early morning practices before breakfast. My mother would often make muffins and after practice we’d have muffins and juice before being dropped off at school. As a result, my Mom tried all kinds of different muffin recipes, so that we could enjoy variety and not get bored with the same old banana muffins 3 times a week.

IMG_2690One of my favorite muffin recipes was one that was filled with jam. Though not quite as tasty as a jam filled donut, I loved these because of the ‘surprise in the middle’. I also found them to be quite tasty and very moist due to the yogurt that is in the recipe.

Of course when we moved to eating dairy free I had to forgo these muffins for a while. Until recently, when I discovered some of the non-dairy yogurts out there. Though most varieties are made from soy, you can find brands that are made using coconut or almond milk as well.

With this discovery, I was now able to recreate these delectable muffins! Of course I had to experiment a bit as I needed to substitute the sugar as well and although most natural sugars can be substituted one for one, I find that when you are also altering another ingredient sometimes the sweetness factor needs to be adjusted to.

This was the case with these muffins as though the kids gobbled them up the first time I made them, both my older son and I felt they could be a little sweeter. So the next time I made them I experimented a little adding a little more coconut sugar then the recipe called for. As I result, I did eventually find the perfect combination.

nancys-cultured-soy-plain-58308The yogurt I use is Nancy’s Organic Cultured Soy, plain. Though they offer many different flavors as well. It is a little thicker than dairy yogurt but definitely works. (Also works fabulously in the Cheesy Greens Macaroni dish that I make, which is soooo good!) I have yet to try a coconut milk yogurt but imagine that this would work out the same.

So if you’re up for a yummy nutritious treat with a surprise in the middle, give these muffins a try. And if you do use the coconut milk yogurt come back and comment and let others know how it worked out.

Jam Filled Muffins

1 1/2 c. flour

1/4 c. + 1/8 c. coconut sugar

2 tsp. baking powder

1/2 tsp. baking soda

1/2 tsp. salt

1/4 c. Earth Balance vegan spread

1 c. non dairy yogurt

1/4 c. almond milk (or favorite non-dairy milk)

1 egg

1/2 tsp. vanilla

Favorite sugar free jam

In a medium bowl blend dry ingredients. In a small saucepan melt Earth Balance. Take saucepan off heat and stir in yogurt, almond milk. Beat in egg and vanilla. Add liquid mixture to dry ingredients and stir until moistened.

*Line cupcake pan with liners or grease well. Spoon in half the batter. Place about 1 tsp. of jam in each muffin, then top with remaining batter.

Bake at 375 F for 15-20 minutes.

Makes 12 muffins.

*Note: I have found with these muffins if you have the cupcake liners that that is best due to the jam sometimes overflowing a bit.

How to make Raw Organic Chocolates

About 8 years ago I took a class at The Light Cellar, here in Calgary, on how to make Raw Organic Chocolate. No sugar, no dairy and all natural ingredients. I was thrilled to find this course as I had been looking for an alternative so that we could enjoy chocolates at Christmas, Easter (and whenever else we wanted some!) without the refined sugars.

I had taken a chocolate making class before, bought the kit, came home and never made chocolates again. This time was different. The difference was you actually make your chocolate from scratch, from natural ingredients and it is very easy (the other class you made your chocolates from premade chocolate bars or pieces that you melted and molded into your own chocolates. I found this process finicky and the pieces were presweetened; so you could not choose your own sweetener).

Chocolate actually comes from a cacao nut, which is made into various forms, such as cacao powder, paste, butter, etc. Making the chocolate is super simple, using four basic ingredients and only takes a few minutes. All you need is cacao powder or paste, cacao butter, some kind of sweetener (honey, agave nectar, pure maple syrup, etc.), and vanilla.

The first step is to melt the cacao butter in a bowl – use the double bowl method with the butter in the top bowl set over a bowl of boiling water (boil water put it into bowl and set on counter; then set your smaller bowl with cacao butter on top)- be very careful not to get any water into the top bowl as it will ruin your chocolate! Once the butter is melted add the vanilla bean and let it infuse (with a knife slice vanilla bean down the middle and scrape out the seeds with a spoon – put into cacao butter). Sift your cacao powder in another bowl and add to taste, then add sweetener of choice. Voila! you now have a nice chocolate sauce which you can leave as is, pour into a pan refrigerate or freeze, or use as a base and add other ingredients.

The instructor did not give us exact amounts of ingredients to make our chocolate. He would provide a starting point and then encouraged us to taste it; to make it how we wanted. He recommended we start with a 1:1 ratio, mix it and go from there. More cacao powder made it a darker, richer chocolate, more sweetener made it sweeter – adjusting it according to our palette and preferences, so we had to taste it as we went along! He also encouraged us to use natural sweeteners and ingredients. For instance, we were using vanilla beans for our vanilla -actually cutting them open and scrapping out the inside. He said we could use vanilla extract but encouraged us to use pure extract if we did, not artificial.

Cacao powder

He described using these pure ingredients as “upgrading” – making it more natural, tastier and better for you. He also told us how we can add other natural ingredients to our chocolates that not only taste good but are high in nutrients, minerals and vitamins,  making it a superfood. Ingredients like goji berries, nuts and seeds, coconut and algae and essential oils. Maca root powder, honey and mesquite powder. He even recommended in one recipe that we try a little cayenne. It was actually really good!

As for the cost, the ingredients to make your chocolate is quite reasonable. The instructor said that in the time it takes for us to go and buy chocolate at the store, we can make it at home faster with fresh ingredients for about $1.50 to $2 per 50 g – which is comparable to what you would pay at the store.

Shaped ice cube trays work great as chocolate molds

I also love the fact that I can add all these “superfood” ingredients to my chocolates so that chocolate really is good for me and the kids. So when they ask if they can have some chocolate, I can say “yes” without feeling guilty or worrying if they are having too much.

It’s also so much fun to make (I’ve already made 3 dozen caramel cups and orange ginger snowmen for Christmas) and easy to do with the kids. You can get different kinds of molds to make different shapes for your chocolates. Experiment and have fun!

In one of my previous posts I described various natural sweeteners that you can use not only in your everyday cooking and baking but for your chocolates as well. Check out that post for more details.

In an upcoming post I will share more about what you can add to your chocolates.

For your information The Light Cellar sells ingredients to make chocolate in bulk and is very well priced. I buy all my ingredients there and usually come out of the store with a big box of items! I find it hard to get out of there with only one or two things.

You can also find many of these products online – Amazon.ca as well as Superfoods.com will carry these products at reasonable prices.