Homemade Marshmallows

Well it’s official! I can now make anything without sugar in it. When we went sugar free we really struggled at first, having to avoid things that we loved and enjoyed. But it was just going to take time to figure out how to make these things like cakes, cookies, chocolate, etc. without the sugar in it. What were the substitutes? How did you do it? It was a huge learning curve.

I assured Matthew, my oldest son that I would figure it out. Cause one of the things I did not want to happen in going sugar free was for him to feel denied. That he could still have the yummy treats that his friends did, with the difference being healthier, better for you.

Slowly I began to build my reperatoire, cookies, cakes, muffins those were easy. Bread, new sweet treat recipes, chocolate…we were getting there. Matthew was pretty happy too, except for one last thing, marshmallows. There was no substitute in the store to buy and I had no idea what to do to make them.

He reminded me of this when we went camping this summer, mentioning that it would be nice to roast marshmallows… “I know” I said and assured him that I was on a mission; as marshmallows were the only thing that I could not make sugar free but I knew there had to be a way.

A little while back I found this recipe for homemade marshmallows on Facebook and just about died! This was the ‘missing link’ that I was looking for. The recipe I needed, and it was totally healthy! Sweetened with honey and very easy to make.

So yesterday was the big day. I tried it out and Wow they were stupendeous! They look and taste like an original marshmallow and I don’t care how many my kids eat!

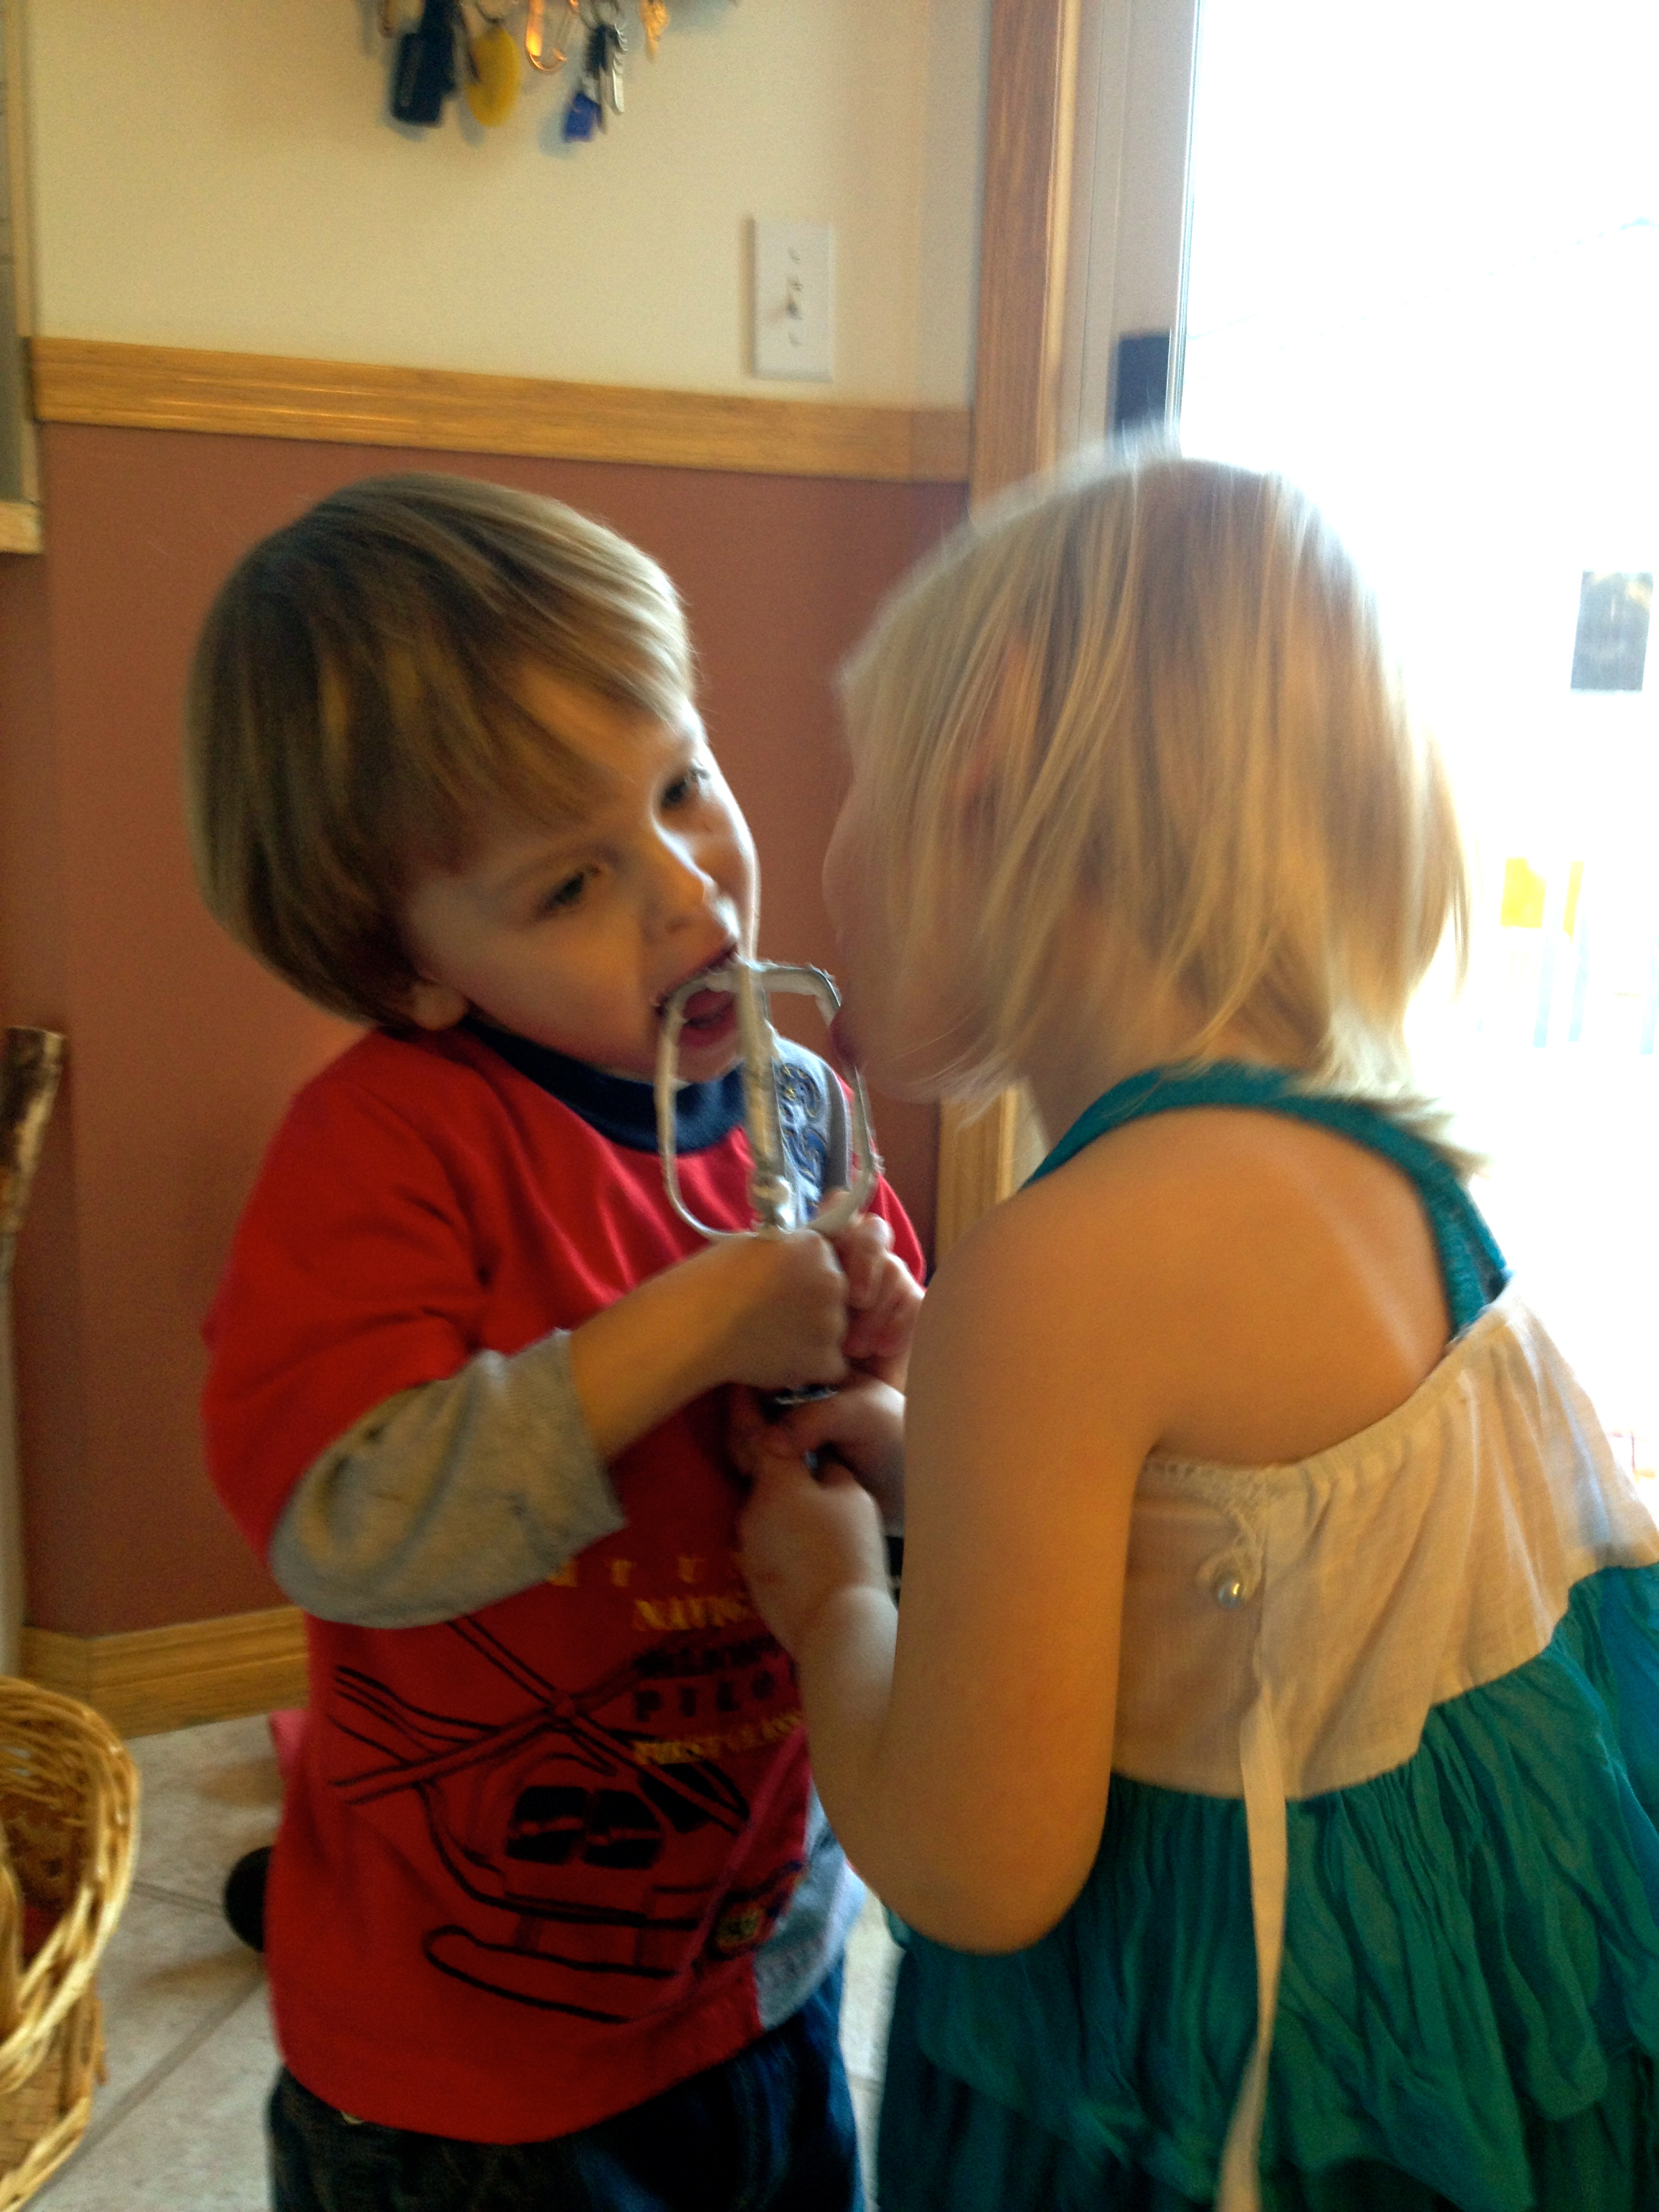
Unfortunately the marshmallows had to sit to set, but I let the kids lick the beaters. As you can see Luke and Chloe were thoroughly enjoying it! Attacking the beater with vigor. Matthew has attested that they taste just like regular marshmallows and just in time for our Halloween campfire tomorrow night.

We are also set for camping next summer! S’mores, rice krispie squares and other marshmallow treats here we come!

IMG_2354

A couple quick tips when making this marshmallow recipe:

When letting it sit to set don’t worry about covering it. I made this mistake and ended up losing some because it stuck to the cover. Oops! lesson learned.

When storing them make sure you line the bottom of your container with parchment paper, and layer it with paper in between. Again, they’ll stick and they’ll peel right off the parchment paper. Don’t forget to put one on the top before you put on the lid!

The mixture starts to set quite quickly so have your pan ready to go, and as soon as the soft peaks form, pour it right into the pan. Don’t worry about the beaters you can take care of those later 🙂

Spooky Halloween Appetizers – Bat Bites

halloween appetizersOne of the things that I have enjoyed about Halloween over the past few years is the unique fun recipes that I have discovered. Now when I say unique and fun I mean ways of taking healthy food and making it into something Halloween themed.

I know I could have been doing this years ago, but since eliminating sugar and going to a sugar free Halloween, my focus has shifted to seeking these things out. I wanted to take the focus off the sugar fest at Halloween and show the kids the other fun aspect of things, like the decorating, festivities and food.

As a result I have made things like Boo-nanas and Apple Bites, which are banana ghosts and ghoulish looking smiles with teeth. I have found veggie platters made into skeletons and this year Bat Bites!

healthy halloween snacks

Apple Bites

These I think are by far the most fun yet. They are made from goat cheese, cream cheese and pesto (of which I have all non dairy substitutions for) and they are not only easy to make but look super cool. These treats are likely more for the adult crowd as some kids may not like the tastes and texture of them.

The trick was when do I make them? Luckily I had planned a wine and cheese for my neighbors and friends very close to Halloween, so I was able to try them out. Of course they were a hit! People loved them, not only how they looked but how they tasted as well.

So if you’d like to get a little creative this Halloween with your eats definitely give these a try! And there are all kinds of ideas out there. Hop on the net and Google it to find a variety of ideas to fit every taste bud.

Bat Bites

4 oz. vegan cream cheese

8 oz. soft mild goat cheese

1/4 c. pesto

2 tbsp. coarsely ground pepper

2 tbsp.poppy seeds

8 pitted olives, sliced

32 triangular corn chips (I just used Tostitos and broke them into smaller triangles)

Mix together cream cheese, goat cheese and pesto. Chill for 40 minutes.

Shape mixture into 16 2 inch balls, about 1 heaping tsp. each. Mix pepper and poppy seeds together in a bowl. Roll balls in poppy seed mixture to cover. Press olives into ball for eyes and insert chips on either side for wings.

healthy halloween snacks

Boo-nanas

Happy Halloween!


Save on Music, Books and DVDs at Indigo.ca

Pumpkin Cheesecake – Absolutely to die for!

It’s coming… Thanksgiving and all things pumpkin! Big feasts, meals with friends and did I mention pumpkin? I love pumpkin and all things related to it, especially pumpkin pie. And Thanksgiving seems to be the only time of year that I make or get some.

Of course with any pie you can make any kind any time you want. But I seem to fall into the  times of the year when they are most prominent, as I imagine do many of us. So though I love pumpkin pie and it is my favorite, I do only get it once a year.

Every year at Thanksgiving I decide I am going to try a new pumpkin recipe, as my sister often makes things like pumpkin ice cream, pumpkin tarts and pumpkin cheesecake. And though I love to branch out and try new things I tend to fall back to my pie. What can I say? It seems just wrong to not have it.

This year I truly did branch out and I made a pumpkin cheesecake for the first time. Not specifically for Thanksgiving, because of course I will make pie, but around the right time 🙂 I found a recipe on Pinterest that looked really good and thought that I would try it.

Being dairy free I thought that I would just have to avoid cheesecake altogether. During the summer my friend decided to try a tofu chocolate cheesecake, which gave me hope. I thought that it would prove to be quite good. Not so much. Though not terrible we both agreed that we would not make it again. Then, I remembered that they make non dairy cream cheese and I had tried it before and liked it, so why not just substitute that into a regular cheesecake recipe? This got me very excited so I went to work.

After I got over just how much cream cheese this recipe called for; I went out got the ingredients and looked at what other substitutions I needed to make. The crust was a bit of a challenge as it called for graham wafers, but I came up with a solution using almond mash leftover from making almond milk, as I had done something similar making a pie before. I substituted coconut sugar for the sugar and then of course the non dairy cream cheese and sour cream (yes this recipe called for sour cream which was another reason why this particular cheesecake recipe intrigued me).

Now this recipe is not one that you can just whip up and have ready in an hour. In fact when I finally went to make it I looked at the recipe, and in reading it more closely almost aborted the whole idea. It was a lot of time, a number of steps and would not be fully ready until the next day (as when it was finished baking you had to let it sit in the fridge overnight).

Let me tell you it is totally worth it! This cheescake is absolutely fabulous, moist, creamy and flavourful. All the kids asked for a second piece and D’Wayne looked like he was in heaven. It was absolutely delicious! I think Matthew even licked his plate and then asked for a third piece of cheesecake (to which of course I said no).

So if you are a fan of cheesecake and even a remote fan of pumpkin this recipe is worth the time and effort put into it. And the nice thing is, dairy free, sugar free, gluten free all equals guilt free and will impress every one of your guests this Thanksgiving.

Or you could just go with plain old pie

Pumpkin Cheesecake

Crust:

12 tablespoons Earth Balance vegan spread

2 1/2 c. almond mash (leftover from making almond milk)

1/4 c. coconut sugar

dash of salt

Cheesecake:

4 – 8 oz. vegan cream cheese

1/4 c. vegan sour cream

2 1/2 c. coconut sugar

15 oz. canned pumpkin

6 eggs, lightly beaten

1 tbsp. vanilla

1 tsp. sea salt

2 1/2 tsp. cinnamon or 2 drops of Cinnamon Bark essential oil

1 tsp. ginger or 1 drop Ginger essential oil

1/4 tsp. cloves or 1 drop Clove Bud essential oil

Postion rack in center of oven. Preheat to 325 F.

Brush a 10 inch springform pan with 1 tbsp. of Earth Balance. In a bowl, stir the remaining Earth Balance in with almond mash, coconut sugar and a pinch of salt. Press mixture into bottom of pan and up the sides. Bake until golden brown about 15-20 minutes.

Cool on a rack, then wrap outside of pan in tin foil and place in a roasting pan.

In a large mixing bowl beat the cream cheese until smooth. Add coconut sugar and beat until just light. Add sour cream, then pumpkin, eggs, vanilla, 1 tsp. sea salt and spices and until just combined. Pour into cooled crust.

Gently place roasting pan into oven (do not pull the rack out). Pour boiling water into roaster until water is about half way up springform pan. Bake until the outside of cheesecake is set but the center is still loose, about 1 h 45 min. Turn off the oven and open the door briefly to let out some heat.

Close oven door and let cheesecake sit for 1 more hour. Carefully remove from roasting pan and let cool on rack. Run a knife around the edges, cover and refrigerate for at least 8 hours or overnight.


Deals of the Week: New deals every week, online only!

A Few Apple Muffins

Apple Cinnamon Muffins

For those of you who caught up with me last week, you’ll be pleased to know that I am still plugging away at using up the apples from my apple tree. Which is really good for you because I am finding and testing some great apple recipes which I then share. Plus my kids and D’Wayne are thoroughly enjoying being the taste testers, as are some of my neighbors.

Like I said there is a serious amount of baking at my house right now. There is not a day that goes by that I am not whipping up something in the kitchen and I am getting good at doing it quickly. Yesterday morning I whipped up some apple muffins between breakfast and heading out to my friends for coffee at 10 am.

Yesterday’s Apple Cinnamon muffin was a gluten, dairy and sugar free muffin, sweetened with maple syrup with coconut oil and flax seed meal. I am finding that I really like those recipes with that little extra kick of nutrition in there. You just mix it in and can’t even taste it.

I found this recipe on another blog site called the The Simple Veganista who shares raw and vegan recipes – who actually found it originally on the blog The Vanilla Bean. And I have to say these muffins are very good! In fact my oldest son Matthew’s response when he came home afterschool was “Damn these are good!” with his face all lit up with excitement.

They are super moist and very tasty. The only downside to this recipe is that one batch does not make enough – only 9 muffins! I did stretch it to 12 but got some very small muffins out of it.

Apple Cake Muffin

Last week I tried the Gluten Free Goddess’s Apple Cake muffin recipe, which we also enjoyed as this muffin has chunks of apple in it which I really liked. Many of the recipes I found called for grated apple and though this was good I wanted to really taste and notice the apple, so I liked the chunks. Her recipes still call for refined sugar so a quick substitution of coconut sugar and I was able to whip these babies up! It even called for powdered sugar sprinkled on top once they were done baking and I was able to substitute for this as well! See recipe below.

I love muffins that have a little sprinkle of something on top, and both these muffin recipes do -the first being a coconut sugar and cinnamon mixture. Yum! There is just something fun about sprinkling something on top 🙂

The only thing I find with the Gluten Free Goddess is many of her muffin recipes are the same base with slight changes in them to make them apple, blueberry or whatever kind of muffin it is. Though I do admire her, as all her recipes are original, tried and true; I like a little more variety in my muffins, which is why I search out other recipes to try. Regardless I do have to say even though her base is the same, I have never gone wrong with one of her recipes. They are always delicious!

Either way I would recommend either recipe if you are looking for a gluten free apple muffin, though the Apple Cinnamon one is the favorite at our house (I used coconut milk for our non-dairy milk, though you can use rice or almond milk if you prefer).

I still have a huge basket full of apples and am not sure what to do with them next as I am really looking for something that will use them up in large amounts! If you have any apple recipes to share please post them in the comments for everyone to try, especially me.

In the meantime go whip up one of these and then sit down for a few minutes and enjoy, savor, maybe grab a cup of coffee, while the kids play quietly….ha ha oh I’m dreaming again!

Regardless enjoy!

Sugar Free Powdered Sugar (replacement for regular icing sugar)

1 cup nonfat dry milk (for dairy free use powdered coconut milk)

1 cup cornstarch

2/3 cup Krisda Stevia for baking

Combine all the ingredients in a food processor or blender and whip until blended and powdered. Store in an airtight container.

This replacement can be used in any recipe calling for icing sugar.

The Magic of Chia Seeds

Chia seeds

Recently I have discovered a lot of recipes with chia seeds in them. I haven’t been purposely looking for them, the recipes I have been picking up lately (such as Chocolate Macaroons) just happen to have them in it. The nice thing about this, I discovered, is that chia seeds are considered another superfood with multiple health benefits. They stabilize blood sugar, reduce cravings for sweets, improve mental focus, are a high quality protein, improve cardiovascular health and many more.

When I first heard about chia seeds I actually wasn’t sure what to do with them and thought they were funny things, these tiny seeds that look like poppy seeds. I knew they had great health benefits but what was the use if I could not use them? Then I found this recipe for chia seed pudding, which I have to admit when I first looked at it thought “Eww! seeds in my pudding”. But since I am into expanding my repertoire of sugar free and dairy free treats I thought I would try it.

I decided to make it for the first time when I was in BC this summer visiting my parents. My Mum is into these things as well and I always like a willing crowd to be my guinea pigs. The first thing I loved about this recipe is that it takes no time at all to make; less than 5 minutes. You literally whisk together the ingredients in a bowl and let it sit. That’s it. I didn’t even divide it amongst individual glasses like it suggested, I just left it in the bowl I made it in. (I also found that though this recipe says serves 4 but you can easily serve 6 and everyone has a decent sized portion).

chia seed pudding

Raspberry Chia Seed Pudding

The second thing I really liked is that when you let the chia seeds sit for a bit they actually expand (size and weight), so it gives the pudding some texture, similar to tapioca. Which is another health benefit, as this ‘gelling action’ when the seed is exposed to water gives you a full feeling for hours – which is great for maintaining a healthy weight. (I also think it’s fascinating 🙂

The pudding was a hit with my parents and the kids. Enough that I have made it again recently and will do so again. I have also discovered a recipe for a Raspberry Chia Seed Pudding, which I have yet to try, but imagine will be just as good.

Chocolate Chia Seed Pudding

chia seed pudding

Chocolate Chia Seed Pudding

1 1/2 c. coconut milk

4 tbsp. maple syrup or honey

2 tbsp. cacao powder

1 tbsp. vanilla extract

1/3 c. chia seeds

**top with berries or coconut cream if desired

Whisk coconut milk, maple syrup or honey, cacao powder and vanilla until smooth. Stir in chia seeds. May divide evenly between 4 glasses or leave in bowl. Let sit at room temperature for 2 hours and serve.

Serves 4 **(You can easily serve 6 with this recipe and have decent sized portions if desired)


A Nice Tall Glass of Lemonade (freshly squeezed and sugar free!)

homemade sugar free lemonade

One of the many things I love about summer are all the cool summer treats to enjoy, such as popsicles, ice cream and a nice tall glass of lemonade on a hot summer day. There’s nothing like sitting out on the patio in the summer heat enjoying an iced cold drink (and maybe the company of friends if they’re available).

It’s such a pleasure to just sit and enjoy after working or playing outside. Often times my neighbor Sheila and I would be out working in our yards, perhaps stop to chat for a bit and then agree to hook up later on one deck or the other to pause for a drink, rest and a chat. My mouth is just watering thinking about it! It’s nice, it gives me pause in my day, some social time and something to look forward to. And to me it definitely terms the “Lazy Days of Summer”.

I used to buy the Minute Maid frozen lemonade mix where you just add water; but now that we are sugar free, I am no longer do that. So the other day I got inspired. I had always heard of people making their own fresh lemonade and knew it was fairly easy to do. I also knew that it required a lot of white sugar, but I wondered, is there a recipe out there that I can sweeten my lemonade with something else? Stevia is the sweetener that came to mind so I hopped on Google to find out.

Sure enough many of the recipes I found required this sugar syrup, but once I narrowed my search actually using the word ‘stevia’ (ha ha) I found some recipes that fit what I wanted. I found this recipe on the Nourishing Gourmet by Kim Harris, and is the one that I recently tested out.

I set out to the store ready to buy fresh lemons, excited to make lemonade that afternoon. And would you believe that Superstore had no lemons that morning? Not a single one in sight, I guess maybe the rest of the world decided to make fresh lemonade as well and had decided to stock up 🙂 No worries we made a quick stop at Sobeys, where they were actually on sale (see there was a reason) and got what I needed.

I used my juicer to juice the lemons which though I find can be just as much work as juicing them by hand; because you have to peel them before putting them into the juicer whereas by hand I would not have to – I seem to get more juice using the juicer.

Chloe and Luke were waiting patiently for their lemonade, climbing up onto the counter to see what I was doing. Asking periodically if it was ready yet. Once I had the lemon juice I added the water and then the stevia. The original recipe calls for 1/2 -1 tsp. but I found the lemonade to be quite tart with only this amount, so I ended up putting in 5 times that amount, 2 1/2 tsp. to get it to the taste that we like. I had used the stevia powder but am going to try using the drops next time as I was having trouble with the powder dissolving and mixing in. Which may have been why it took so much. I never even thought of using the drops until I read it in the comments on another website. I’ll try it out and let you know.

Luke, Chloe and Matthew all tested and enjoyed the lemonade, confirming that it was sweet enough. Especially Matthew who had taste tested a less sweeter version when I was adding sweetener. And the twins kept asking for more and more. In fact, I think they would have drank a less sweet version without any problems. Regardless we enjoyed it, it was easy to make and is good for us!

So if you’re looking for a nice tall glass of lemonade on a hot summer day and you have a few lemons kicking around, try out this recipe. Not only will you get a nice vitamin C kick but you won’t have to worry about any sugar rushes for yourself or the kids! Now if you’ll excuse me I have to head out onto the patio…

Freshly Squeezed Homemade Sugar Free Lemonade

1 c. freshly squeezed lemon juice (about 4-6 lemons)

1/2 -1 tsp. stevia powder (or more to taste)*

6 c. water

Mix all ingredients together in pitcher. Add stevia to taste, start with less and add more as desired. Pour into a glass and enjoy! May serve chilled or over ice.

*may use 8-10 stevia drops in place of powder

Want to make your lemonade a little more exciting or add a different flavor? Try adding essential oils. Here are some suggestions and the benefits:

  • 2 drops of Lavender essential oil– floral flavour and calming
  • Slices of nectarines and 2 drops Spearmint or Peppermint essential oil – refreshing and energizing
  • A handful of blackberries and a couple of drops of Basil essential oil – sophisticated and soothes digestion improves focus.
  • Slices of cucumbers and two drops of Grapefruit essential oil – refreshing and curbs your sweet tooth.
  • One drop of Cinnamon Bark essential oil and a dash of vanilla powder or a vanilla bean – Energizing spicy mix that kick-starts digestion.

Other essential oils you could try in your lemonade: lime, ginger, orange, cilantro, cardamom, thyme…

*note: not all essential oil brands are created equally. Due to the lack of regulations on how to produce essential oils currently 95% of essential oil brands on the market  have synthetics and fillers in them and are not safe to ingest. Ensure that you are using a brand that is 100% pure and safe to ingest. doTERRA essential oils are a brand that is 100% pure and safe for internal consumption.

Yummy Easy Vegan Treats (with chocolate!)

I love shopping at Community Natural Foods, a local organic and natural food store. Not only do they have a wide variety of products available and good prices, they often have someone there sampling yummy recipes. Not only do they provide the samples for you but they also have the recipe printed out and ready for you to take a copy!

Not only are the recipes delicious they are good for you, often a vegan recipe with natural sweeteners and usually a little pinch of some kind of superfood in there. This is where I have gotten the Cinnamon Salted Caramel Brownie recipe that I made and shared with all my friends in Kananaskis last January – which everyone loved and would never have known that it was no dairy, no sugar unless I had told them. So I was quite excited when I went in on Saturday and discovered 2 yummy recipes to try.

I was so excited I came right home and made them both, even having to run back out to the store to grab a missing ingredient. Fairly quick and easy they both turned out fabulously! I even shared a sample with a couple of my neighbors who quickly asked for the recipe.

I love it when I find good recipes like this as I think that a lot of people feel that eating healthy means more fruits and vegetables and that you have to give up a lot of the sweet treats, which just isn’t true. You can find many, if not even more delicious in some cases, treats that not only satisfy your ‘treat fix’ but provide many essential vitamins and nutrients that our bodies need. It’s great, have a sweet and it’s actually healthy and beneficial for you!

No Bake Chocolate Macaroons

1 banana

1/4 c. coconut oil

1/4 c. pure maple syrup

1/2 tsp. vanilla extract or 2-3 drops madagascar vanilla essential oil

6 tbsp. cacao powder

1.5 c unsweetened coconut

1 tbsp. chia seeds

small pinch sea salt

In a medium size bowl mash banana well until there are no clumps. Stir in melted coconut oil, maple syrup and vanilla. Sift cacao powder and stir into banana mixture. Stir in chia seeds, coconut and salt.

Line baking sheet with parchment paper. Drop a teaspoon at a time onto parchment paper. Put in freezer for 20 minutes or until firm. Store in freezer until ready to enjoy.

Makes approx 15 macaroons.

Almond Butter Rice Crispy Treats

1/2 c. chunky almond butter

1/2 c. brown rice syrup

1 tbsp. vanilla

1 tbsp. Earth Balance

1/2 tsp. sea salt

3.5 c Erewhon Brown Rice Crisp cereal

Chocolate Drizzle

1/4 c. homemade raw organic chocolate, left in liquid form

1 tbsp. almond butter

pinch salt

Shredded coconut for garnish

Line an 8×8 inch square pan with parchment paper.

In a large pot put in brown rice syrup, Earth Balance, almond butter and salt. Melt over medium low heat until well combined and heated through. Remove from heat, stir in vanilla; then stir in brown rice cereal.

Scoop and spread evenly into 8×8 pan. Press down with finger or roll with a pastry roller (just a note about the pastry roller – I had never thought of using this before and seriously it is the cat’s meow. Way easier then trying to press it into the pan with your fingers and makes it flatter and smoother). Place in freezer for 5 minutes while you make chocolate glaze.

Make raw organic chocolate according to recipe (cacao butter, vanilla, natural sweetener and cacao powder – for full recipe and directions go here). Stir in almond butter and salt.

Remove pan from freezer and drizzle with chocolate. Sprinkle with coconut and place in freezer until firm – about 15 minutes. Slice into squares.

Bars will hold their shape quite well at room temperature but may be stored in freezer or fridge.

Summer Tidbits

Summer is here! Hooray! It seems like we wait all year for this season and when it finally gets here there is so much to do. I always find that the summer is so short and chalk full of activities. Before summer even begins we have it fully planned out with lots of trips, adventures and explorations. I am often thinking about summer in April or May making the plans that I want to make as I know it fills up so quickly.

We do a lot of car travel in the summer, going to the mountains, camping and visiting my family in the Okanogan. It is busy but we have a great time as I like to make the most of the season and do and see as much as we can.

With these things in mind I am recapping my favorite summer posts, activities, recipes, games that help make the road trips easier, the hot summer days more enjoyable and keep everyone eating healthier. Of course I’ll add more as this summer goes on but here are some great tidbits to get you started – with my favorite Car Games for Kids! (I have to say Counting Cows is my absolute favorite and one that we play again and again)

Summer Road Trips – Car Games for Kids http://www.mommaonthemove.ca/index.php/archives/111

Grasshopper Popsicles http://www.mommaonthemove.ca/index.php/archives/44

Crunchy Broccoli Feta Salad http://www.mommaonthemove.ca/index.php/archives/1597

Hiking with Children http://www.mommaonthemove.ca/index.php/archives/295

Crunchy Broccoli and Feta Salad

One of the things I love about summer (I know it’s not quite summer yet, but it’s on my mind), is all the comings and goings, the possibilities and options of places to go and see and explore. There is so much to do that you can easily be gone all day everyday if you chose to.

I love taking the kids out whether it be to the zoo, Heritage Park or checking out a new park in the city. One of the challenges and things I really don’t enjoy so much, is packing lunch for the day. Snacks are easy enough but I find that peanut butter sandwiches are only exciting for so long and then we need something new. I also like things that are ready to grab and go so packing lunch takes no time at all. I also like variety; so salads, things with vegetables and different flavours and textures. Makes the trip more enjoyable cause you’re looking forward to lunch, and life more exciting!

So I usually prepare ahead of time and freeze, muffins and cookies to take or other meals that are easy to make ahead and just grab the day of. That’s why I was very excited when I discovered this broccoli salad recipe. It’s fresh, crisp, has a zippy flavour and is lovely on a summer day. Plus I love feta cheese! and though I am dairy free, I discovered that goat feta is ok for me as it is not considered dairy as it does not come from a cow. (And if it makes a difference to you make sure you check the label when you are buying it – I had no idea that you could have cow feta until someone pointed it out to me, I just assumed they were all goat). Which I say thank God to that! Cause I love feta!

Crunchy Broccoli and Feta Salad

1 bunch broccoli

2 tbsp olive oil

2 tbsp wine vinegar

2 tsp dijon mustard

1 clove garlic, minced

1/4 tsp. each sea salt and pepper

1 cup crumbled feta cheese (I use goat feta as it is considered a non-dairy because it does not come from a cow)

1 cup grape or cherry tomatoes, halved

1/2 c. red onion, very thinly sliced

Cut broccoli into florets. Peel and cut stems into 1/4″ thick slices.

Pour enough water into saucepan to come 1″ up side and bring to a boil. Place broccoli in steamer basket in saucepan; cover and steam until bright green but still crisp – about 1 minute. (Do not overcook! I have made the mistake a couple of times of leaving it too long and ended up with mushy broccoli and it does not taste so good in the salad. One minute is really all you need). Drain water.

In a large bowl, whisk together oil, vinegar, mustard, garlic, salt and pepper. Add broccoli, feta, tomatoes and onion. Toss to coat.

Can be made a head and refrigerated.

If only I had had this when…

It’s an interesting world out there. Things are changing and shifting, people are moving into different lifestyles, healthier, more active and for many of us, looking to slow down and become less busy! Enjoy more leisure time and be able to enjoy it -meaning having your health and the energy to do so.

We have definitely made a number these lifestyle changes at our house, the biggest one being the elimination of sugar, which was not an easy task. It was a huge learning curve and a big revamp of what we ate and how we made it. I learned all about the difference between refined and natural sugars, what substitutes to use in recipes, as well as the effects of sugar on our bodies. It was a huge undertaking and I did it all at once! Which may have not been the smartest plan but we learn.

I have noticed though that more and more people and families are also starting to reduce or eliminate the amount of sugar in their diets, recognizing the negative effects they have on our bodies, behavour, immune system, sleep, etc. I have also noticed that more articles on the topic are appearing in magazines, health practitioners are encouraging it and more resources are becoming available to help support families in this decision to enjoy a healthier lifestyle without sugar.

Recently I discovered a book titled Beat Sugar Addiction Now! For Kids. This is a wonderful book and one that I wish had been published when I was eliminating sugar in our house. It not only provides background and scientific research as to why we should eliminate sugar and what it’s effects are but it provides a step by step program for parents to eliminate sugar in the kids diets.

Their plan is a gradual process of eliminating sugar, not straight across the board like I did and honestly I would not recommend the way I did it, unless you had to for some reason. They do it a step at a time, reducing or eliminating a little bit, making small but consistent changes so that the kids can get used to it. They also say this aids in reducing the withdrawal symptoms and the fights and tantrums you could experience on a much lesser scale. Therefore being easier on you the parent as well as the child.

They provide tips on how to talk to your child about it and divide it into different age groups, as well as suggestions as to what to use for substitutes. They also talk about how to get your spouse on board, handle peer pressure and ways to help them follow the rules away from home. (I have found this to be my biggest challenge with my oldest son. He has no problems at home with how and what we eat or even when we visit relatives, but the challenge is when he goes to school and is ‘surrounded’ by all the processed and sweet treats that all the other children have. As though there are more and more people who are making these choices as well there are still many who aren’t. It makes it extremely hard for Matthew and sometimes he succumbs to the pressure. I wish I had had these tips when we began. Though we can implement them now it would have been easier to have them from the beginning).

I think it’s great that this book (and other resources) are becoming more available. It certainly makes it easier to make these changes when you have a guide or someone to share the experience with – support. It also helps the kids to recognize that the world is coming along too, simply meaning that they are not alone. As I know that is often how Matthew feels, like he is the only one and that he is being denied something that everyone else can have. But when he sees that more and more people are doing it, more options and that the world is ‘jumping on the train’ then it makes it easier.

I have often told Matthew that we are being leaders in this no sugar journey and that sometimes it is challenging to be the first, but that the rest of the world will catch on. He just kind of sighs and it doesn’t make him feel better but he accepts it, even if only a little. When things like this, the book or other written materials, come out to support what we are doing it is really helpful for all of us.

My point is if you are considering reducing or eliminating sugar consumption in your family’s diet that this book Beat Sugar Addiciton Now is a great resource and I would highly recommend using it.

If you do or have already embarked on the journey of eliminating sugar please come back and leave a comment here, sharing your story. Forming a sense of community and support is also key to being successful. Often times as well people have great tips and experiences to share as well as yummy recipes!